bast

Bast

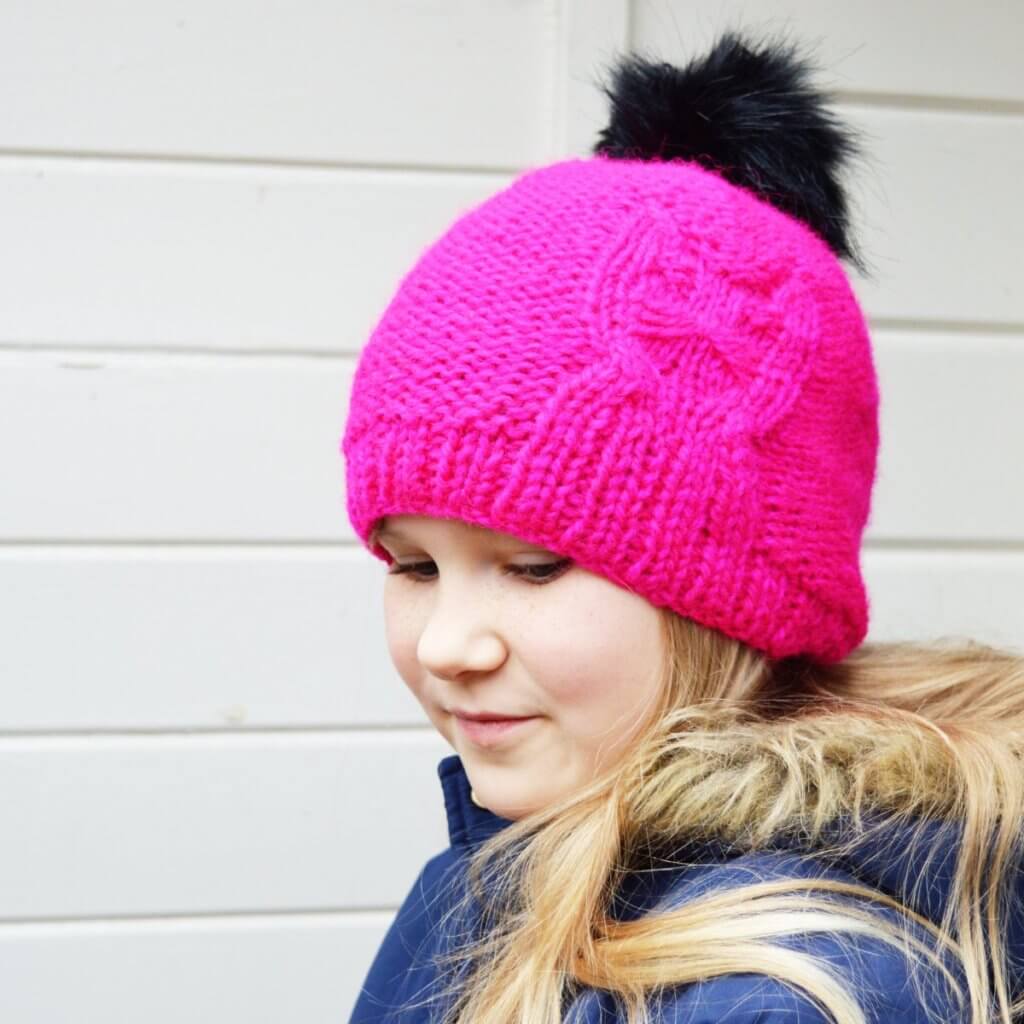
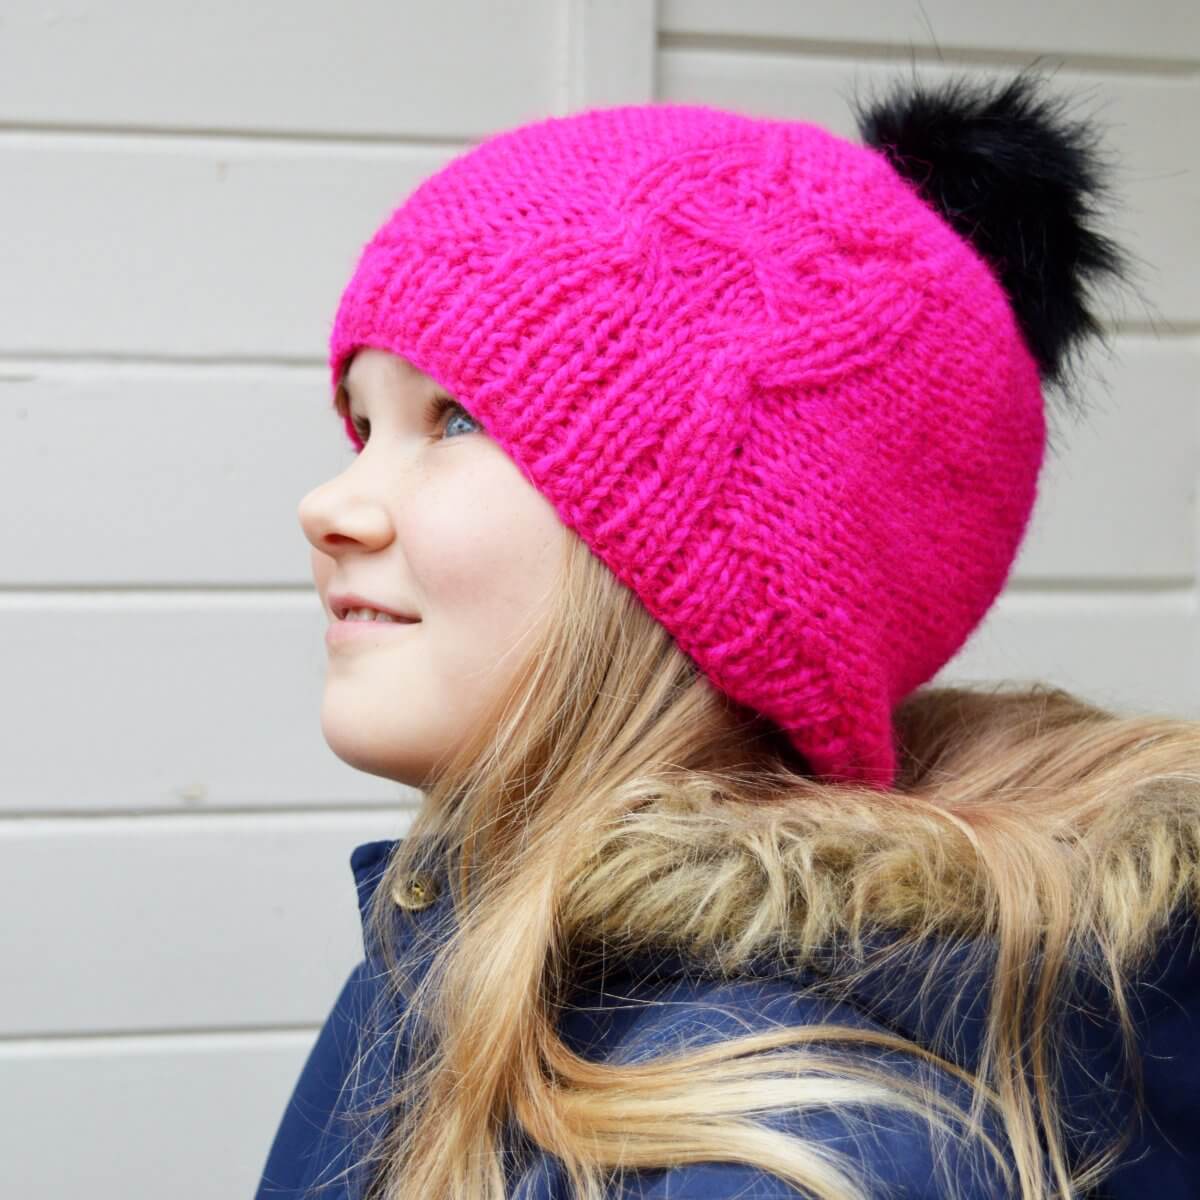
What is one to do when dear daughter requests a hat with kitty cats? Design one, of course! Bast is a cute hat with cables and texture to create a kitty cat motif. Worked in a bulky weight yarn this hat knits up super quick, perfect for a last minute gift!

This pattern contains instructions for 5 sizes, ranging from child to adult. The Bast hat is seamless and knitted from the bottom up. The instructions for the cat motif are provided both charted and written out.


Pay what you want: (minimum €4.90)

Add to cart


Difficulty level

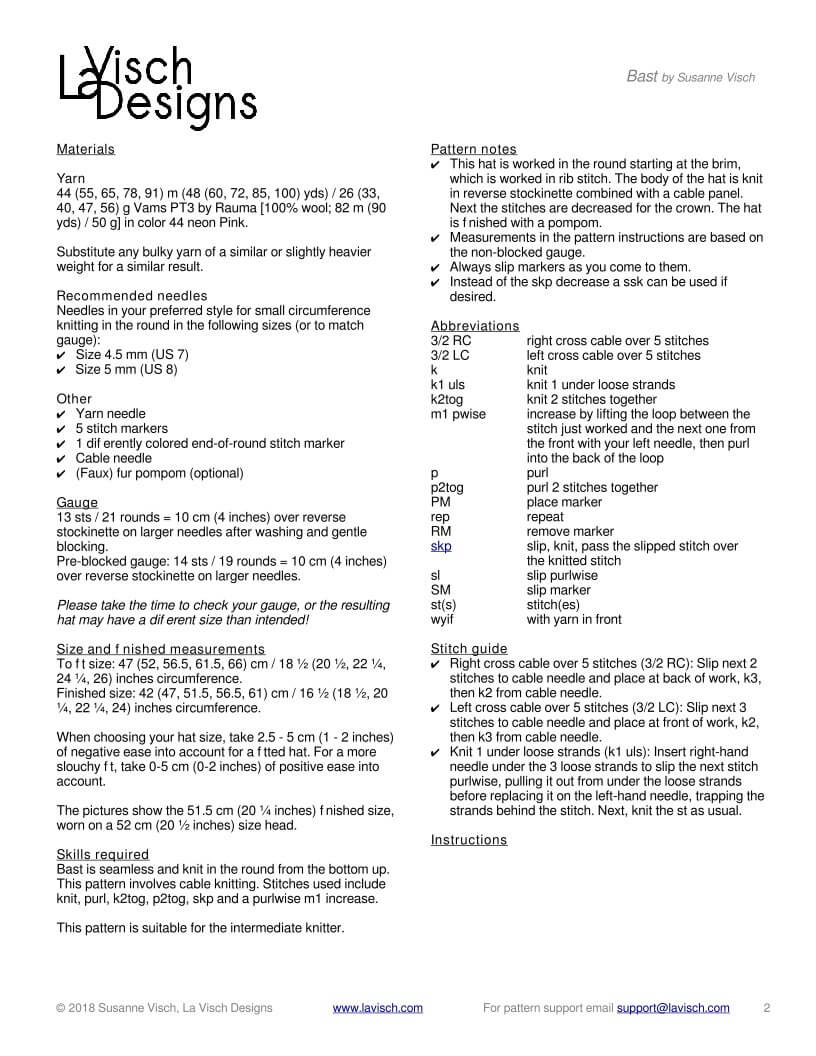
Bast is seamless and knit in the round from the bottom up. This pattern involves cable knitting. Stitches used include knit, purl, k2tog, p2tog, skp and a purl wise m1 increase. This pattern is suitable for the intermediate knitter.

Sizes and finished measurements

To fit size: 47 (52, 56.5, 61.5, 66) cm / 18 ½ (20 ½, 22 ¼, 24 ¼, 26) inches circumference. 
Finished size: 42 (47, 51.5, 56.5, 61) cm / 16 ½ (18 ½, 20 ¼, 22 ¼, 24) inches circumference.

When choosing your hat size, take 2.5 – 5 cm (1 – 2 inches) of negative ease into account for a fitted hat. For a more slouchy fit, take 0-5 cm (0-2 inches) of positive ease into account. 
The pictures show the 51.5 cm (20 ¼ inches) finished size, worn on a 52 cm (20 ½ inches) size head.

Pattern details

  • Bast is written for a gauge of approx. 13 sts / 21 rounds = 10 cm (4 inches) over reverse stockinette on larger needles after washing and gentle blocking.
  • Pattern languages included: English and Dutch (Dit patroon omvat zowel een Nederlandse als een Engelse versie)
  • Digital PDF has 3 pages in the English version and 4 in the Dutch version (letter size)

Materials

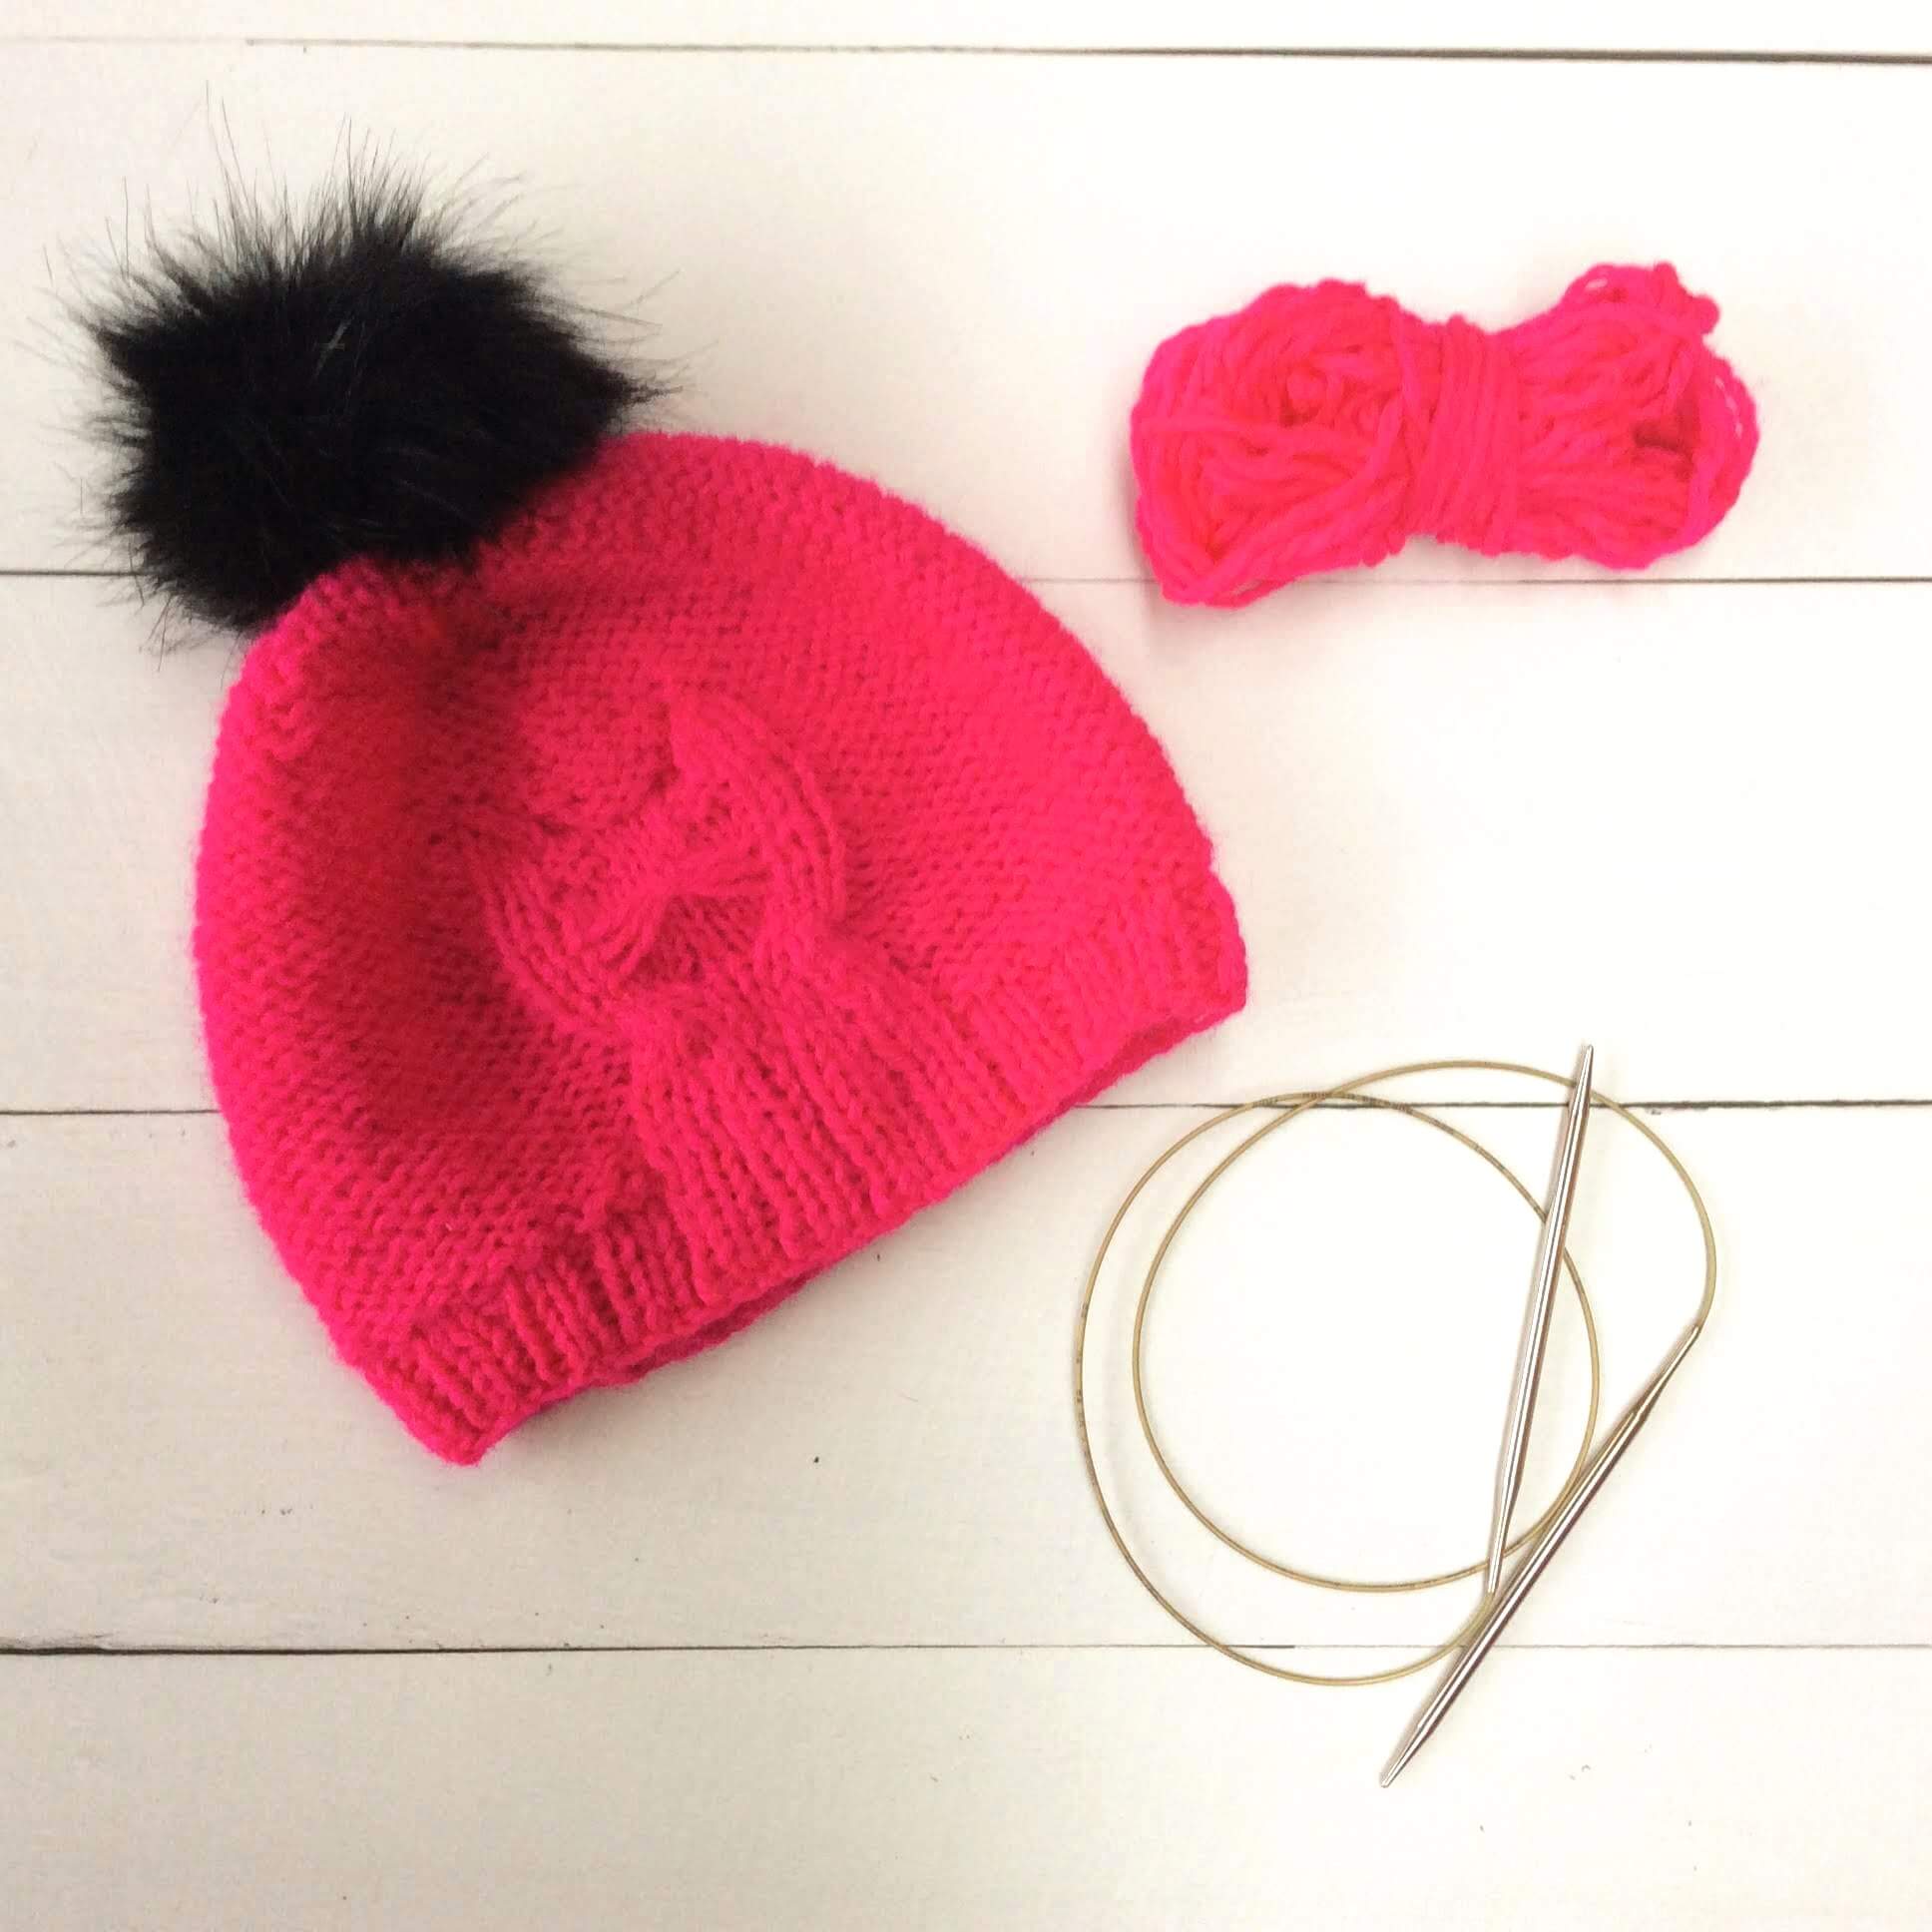
  • Yarn: 44 (55, 65, 78, 91) m (48 (60, 72, 85, 100) yds) / 26 (33, 40, 47, 56) g Vams PT3 by Rauma [100% wool; 82 m (90 yds) / 50 g] in color 44 neon Pink. Substitute any bulky yarn of a similar or slightly heavier weight for a similar result.
  • Knitting needles in your preferred style for small circumference knitting in the round in the following sizes (or to match gauge): Size 4.5 mm (US 7) and Size 5 mm (US 8).
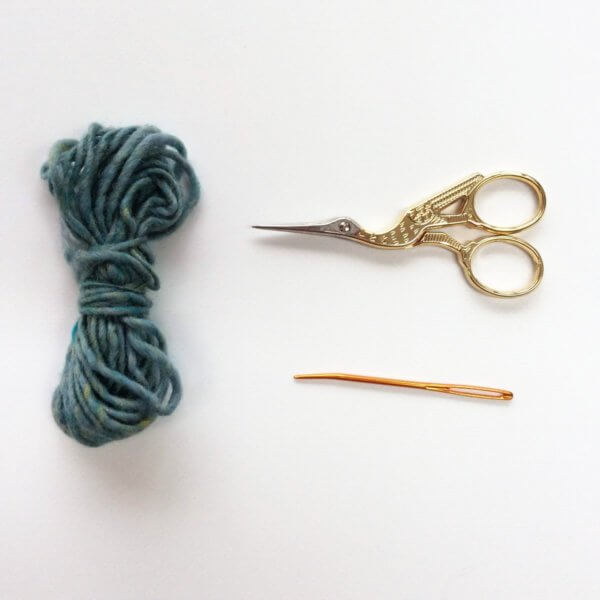
  • Yarn needle
  • 5 stitch markers
  • 1 differently colored end-of-round stitch marker
  • Cable needle
  • (Faux) fur pompom (optional)

bast Read More »

tutorial – fixing a dropped stitch in garter stitch

Fixing a dropped stitch in garter stitch by La Visch Designs

When I finished my Sirac stole, blocking was, of course, needed to let that cable & lace panel shine. And that was when I saw it… A dropped stitch, smack in the middle of one of the garter stitch panels. I must have knit through part of the strand, breaking it when brought under tension with the blocking. Or I just missed it. Whatever the cause, I needed to fix this!

To start, I just secured the dropped stitch with a locking stitch marker to prevent it from laddering down. I worked this particular project in a sticky kind of wool, but under tension, all yarn will ladder down in knitting. So, better safe than sorry and use that stitch marker!

Fixing a dropped stitch in garter stitch - by La Visch Designs

After the project was completely dry, I could remove it from the blocking mats and fix the stitch. If the project was still on the needles, I would just have worked it back up with a crochet hook. This project was already bound off and blocked. Therefore I went with a duplicate stitch approach instead. For this you need some of the yarn remaining from your project, a darning needle (I like the blunt tipped kind best for this kind of work), and some scissors:

Fixing a dropped stitch in garter stitch - by La Visch Designs

Fixing a dropped stitch in garter stitch step-by-step

Normally I would use a contrasting yarn in a tutorial, so you can see better what I’m doing. In this case, however, I used the project yarn for the repair. To make it a tad better to see, I’ve held it double with some white crochet cotton and I’ve added some coloring during photo editing.

1. Start with threading a length of the yarn through the darning needle. Approx. 60 cm (24 inches) should be enough for single dropped stitches like this one.

Fixing a dropped stitch in garter stitch - by La Visch Designs

2. First, thread your needle through the dropped stitch to secure it. Make sure you pull about half the length of yarn through the stitch.

Fixing a dropped stitch in garter stitch - by La Visch Designs

3. Now, with half the length of the yarn, I’m going to follow the route of the yarn in the stitches on the row the dropped stitch should have been worked in. I’ve made these stitches turquoise in the picture below, to make it a tad easier to see.

Fixing a dropped stitch in garter stitch - by La Visch Designs

4. In this picture, the side left of the dropped stitch is all done, on the far left you see the little bit of yarn tail that remains.

Fixing a dropped stitch in garter stitch - by La Visch Designs

5. Next, repeat threading the yarn through the stitches on the right of the dropped stitch, using the other end of the piece of yarn. Below you see the result, with the yarn needle indicating the place of the dropped stitch.

Fixing a dropped stitch in garter stitch - by La Visch Designs

And this is how it looks on the other side of the work:

Fixing a dropped stitch in garter stitch - by La Visch Designs

After removing the contrasting cotton thread, this is how it looks like from the right side of the work:

Fixing a dropped stitch in garter stitch - by La Visch Designs

And yes, I know that I should have threaded the new yarn over the dropped stitch as well, to imitate the purl bar of garter stitch fabric. Now it looks a bit like a single stockinette stitch in all that garter stitch. Learn from my mistake! I know I will with any future dropped stitches in garter stitch fabric.

Patreon logo

Thanks to my Patreon supporters for bringing you this freebie! Creating quality patterns and tutorials is a lot of work and resource-intensive. However, I find it important to give you free content like this tutorial. Thanks to the generous support of my Patreon supporters, I can make it happen. Thank you, patrons! Click here to join, or click here to read more about La Visch Designs on Patreon.

tutorial – fixing a dropped stitch in garter stitch Read More »

honey & stripes

Honey & Stripes shawl

Honey & Stripes is a simple yet stylish triangular shawl knit sideways on the bias. The combination of striped garter stitch, easy to memorize garter stitch lace, and slip stitch patterning makes it a perfect choice for those colors of fingering weight yarn that combine so well. With its generous size, Honey & Stripes is perfect to wear as an elegant scarf.

The pattern contains fully written out instructions as well as charts for the lace and slip stitch sections.


Pay what you want: (minimum €6.50)

Add to cart


Difficulty level

Stitches used include knit, purl, yo, k2tog and kfb. This pattern is suitable for the advanced beginner or intermediate knitter.

Sizes and finished measurements

One size (easily adjustable): Finished dimensions of the sample shawl: 181.5 cm (71 ½ inches) along the upper edge and a depth of 59 cm (23 ¼ inches), measured after blocking.

Pattern details

  • Gauge: Gauge is not critical in this design. For the sample shawl measured after blocking: 15 sts / 24 rows = 10 cm (4 inches) over garter stitch stripes.
  • Pattern languages included: English and Dutch (Dit patroon omvat zowel een Nederlandse als een Engelse versie)
  • Digital PDF has 4 pages (letter size)

Materials

  • Yarn: Lang Yarns Magic Tweed Superwash (62% virgin wool, 18% nylon, 10% viscose and 10% acrylic; 200 m (219 yds) / 50 g) in the following amounts and colors:
    C1: 200 m (219 yds) / 50 g in 4082 Gold.
    C2: 200 m (219 yds) / 50 g in 4091 Petrol.
    C3: 200 m (219 yds) / 50 g in 4083 Copper.
    Substitute any tweedy fingering weight yarn for a similar result.
  • Size 4 mm (US 6) / 80 cm (32 inches) circular needles
  • Yarn needle
  • 2 stitch markers

honey & stripes Read More »

sirac

a design by La Visch Designs

Sirac is a highly customizable stole in 2 colors. Make it longer, shorter, wider or narrower; it’s all possible because the pattern allows for easy modification. Sirac has both interesting and mindless knitting, therefore this really is the perfect project for me!

This stole is knitted back and forth, starting with the cabled lace panel. Next, stitches are picked up and knit on the long sides of the lace panel for the garter stitch sections. Also, the instructions for the lace are provided both charted and written out.


Pay what you want: (minimum €6.50)

Add to cart


Difficulty level

This pattern features a lace and cable panel, which contains patterning on both RS and WS rows. Techniques used include knitting cables with a cable needle as well as picking up and knitting stitches. Stitches used include knit, purl, k2tog, skp, double yo, and simple cables. This pattern is suitable for the intermediate knitter.

Size and finished measurements

One size – finished dimensions: 55 cm (21 ¾ inches) wide and 168 cm (66 ¼ inches) long, measured after blocking. Change the size of this stole by adjusting the number of repeats worked in the various sections. This will, of course, impact the amount of yarn needed.

Pattern details

  • Gauge: Gauge is not critical in this design. For the sample shawl: 9.5 sts / 26 rows = 10 cm (4 inches) over garter stitch, measured after blocking.
  • Pattern languages included: English and Dutch (Dit patroon omvat zowel een Nederlandse als een Engelse versie)
  • Digital PDF has 4 pages (letter size)

Materials

  • Yarn: Filature de Valgaudemar Sirac (100% wool; 125 m (137 yds) / 50 g) in the following colors and amounts: C1: 275 m (301 yds) / 110 g in “Rouge” and C2: 375 m (411 yds) / 150 g in “Titane”. Substitute any thick-and-thin single ply type wool yarn of comparable weight for a similar result.
  • Size 4.5 mm (US 7) / 80 cm (32 inches) circular needles.
  • Cable needle
  • Yarn needle

sirac Read More »

tutorial – pick-up & knit from garter stitch

Tutorial pick-up & knit from garter stitch - by La Visch Designs

In my Sirac stole design a center panel in a Cable & Lace pattern is worked first, after which stitches are picked up and knit on the long sides of the panel. After this, the rest of the pattern can be worked perpendicular to the Cable & Lace panel. One of my testers (hi Marilyn!) mentioned that it would be a good idea to dedicate a photo tutorial to the technique used for that. So here we are!

Of course, there are many ways to accomplish this. In this tutorial, I’m focusing on “pick-up and knit” from a garter stitch piece, worked without a chain stitch selvage. Such a selvage is pretty neat for picking-up stitches, but it also makes the selvage tighter than may be preferable. In such cases, it’s good to know how to pick-up & knit stitches from a regular garter stitch edge.

The difference between “pick-up” and “pick-up & knit”

It may be confusing what exactly the difference is between just “pick-up” and “pick-up & knit”. I mean, both have some picking-up action going on. The main difference is, that with just “pick-up” stitches of the piece already worked are placed on the knitting needle without introducing new yarn.

With “pick-up and knit”, new yarn is pulled through the piece already worked and the loops are placed on a knitting needle. These new loops are the new stitches from which the rest of the piece is worked.

Pick-up & knit from garter stitch step-by-step

In this example, I’m using a contrasting yarn for the pickup & knit part, to make it easier for you to see what exactly I’m doing and where.

1. We start with a piece of knitting worked completely in garter stitch, turned sideways with the RS facing. And yes, plain garter stitch does not really have a RS and WS, but it can have when there is patterning on a background of garter stitch.

Tutorial pick-up & knit from garter stitch - by La Visch Designs

2. Insert your needle (or crochet hook if you find that easier!), from front to back, between the garter stitch ridges, between the last and second-to-last columns of stitches. In other words: in between the ridges and 1 stitch in from the edge.

Tutorial pick-up & knit from garter stitch - by La Visch Designs

3. Wrap your yarn around the needle or crochet hook…

Tutorial pick-up & knit from garter stitch - by La Visch Designs

4. …and pull the loop of yarn through the work and place it on the needle.

Tutorial pick-up & knit from garter stitch - by La Visch Designs

5. Repeat steps 2-4, picking up 1 stitch per garter stitch ridge until all ridges have been worked. The result looks like this from the RS:

Tutorial pick-up & knit from garter stitch - by La Visch Designs

This is how it looks from the WS:

Tutorial pick-up & knit from garter stitch - by La Visch Designs

Next, you can start knitting according to your pattern. Take care, though, to see whether the stitches are positioned normal or twisted. The stitch mount has a potential impact on your project!

Stitch mount

Stitches have a left and right leg. The way they are positioned on the needle impacts the look of the stitches when knit. In the picture below on the left, you can see the regular orientation with the right leg in front of the needle. On the left there is a twisted stitch: the left leg of the stitch is in front of the needle. This is no problem though: Just knit (or purl) the twisted stitch through the back loop to untwist the stitch mount.

Making a crochet provisional cast-on - a tutorial by La Visch Designs

And here how it looks with some more rows worked from the RS:

Tutorial pick-up & knit from garter stitch - by La Visch Designs

And from the WS:

Tutorial pick-up & knit from garter stitch - by La Visch Designs

The white part looks a tad wider than the “body” of the piece because I used a slightly heavier weight yarn!

Patreon logo

Thanks to my Patreon supporters for bringing you this freebie! Creating quality patterns and tutorials is a lot of work and resource-intensive. However, I find it important to give you free content like this tutorial. Thanks to the generous support of my Patreon supporters, I can make it happen. Thank you, patrons! Click here to join, or click here to read more about La Visch Designs on Patreon.

tutorial – pick-up & knit from garter stitch Read More »

green madeira

Green Madeira shawl

Green Madeira is a semi-circle Pi shawl, designed for the gorgeous gradient yarn used. While I made my version in a mohair type yarn, any worsted weight gradient yarn would make a lovely shawl with this design!

Work this shawl from the top-down, starting with a garter stitch tab. The instructions for the lace are, of course, both charted and fully written out.


Pay what you want: (minimum €6.50)

Add to cart


Difficulty level

The half-circle Green Madeira shawl is knit from the top down and is started with a garter tab cast-on. Lace patterning is worked on both RS and WS rows. Stitches used include knit, purl, yo, m1, skp, k2tog, and p2tog. This pattern is suitable for the intermediate knitter.

Size and finished measurements

Finished dimensions of the sample shawl: span width of 172 cm (67 ¾ inches) and a depth of 63 cm (24 ¾ inches), measured after blocking.

Pattern details

  • Gauge: Gauge is not critical in this design. For the sample shawl: 11 sts / 24 rows = 10 cm (4 inches) over stockinette, knitted on smaller needles and measured after blocking.
  • Pattern languages included: English and Dutch (Dit patroon omvat zowel een Nederlandse als een Engelse versie)
  • Digital PDF has 4 pages (letter size)

Materials

  • Yarn: 420 m (459 yds)/ 150 g Pro Lana Woolly Hugs Bobbel Mohair (45% Acrylic, 40% Nylon, 15% Mohair; 420 m (459 yds)/ 150 g) in “203 Green”. Substitute any worsted weight mohair-type yarn with long color changes for a similar result.
  • Size 5 mm (US 8) / 80 cm (32 inches) circular needles
  • Size 5.5 mm (US 9) knitting needle (for bind-off only).
  • Yarn needle
  • Stitch markers to use in between lace repeats (optional)

green madeira Read More »

tutorial – knitting colorwork tips

Colorwork tips - a tutorial by La Visch Designs

Knitting color work besides giving a gorgeous result is also a lot of fun. I must admit I haven’t gone beyond knitting color work with 2 colors yet, at this point in time. Doing that though, I have come across some things that make it easier to do and get a lovely result. And, of course, I love to share these color work tips with you!

1. Picking your colors

Perhaps you’ve already noticed it with previous projects: sometimes when colors seem to go perfectly with each other, the result is just disappointing when combined. One possible reason for this is that the colors don’t have enough contrast between them. But how to make sure there is enough contrast? Read on this tutorial!

Contrast in color work - a tutorial by La Visch Designs

2. Start with a small project

Handling multiple strands of yarn at the same time while following a chart can be pretty daunting if you’ve never done so before. My advice would, therefore, be to start with a smallish project and limit yourself to only 2 colors. Think for example of a hat, like the Pijl hat pictured below.  This way you can find out how to hold your yarn etc. without adding an extreme tangle to the mix that even more colors of yarn could potentially bring.

Pijl hat

3. Managing floats

The pieces of yarn running at the inside of a color work project knitted in the round are called “floats”: the lengths of yarn not being knitted and simply carried along the back.  Because they run at the inside circumference of the project, there is a risk of them getting too short and tight. This, in turn, will lead to puckering in the finished item. The solution is luckily a very easy one: just turn your knitting inside-out so the floats are on the outside circumference while knitting! This will usually give enough slack in the floats to avoid puckering. This is, by the way, a pic of my Bloem hat while in progress.

Color work tips - by La Visch Designs

4. Gauge

Most knitters find that when knitting color work their gauge ends up much tighter (more stitches per 10 cm / 4 inches) than when knitting in a single color with that particular yarn/needle combination. This is because the floats lack the elasticity of regular knitting stitches. This may mean that a color work hat, sweater or sock turns out much smaller than expected.  It’s therefor a good idea to either start with a smallish part of the project like a sleeve (for a big project like a sweater) or swatch. Don’t forget to swatch in the round though, because this is usually different from the gauge when worked flat.

5. Fixing mistakes

Let’s face it: mistakes will probably be made. I know I do! With some, you can just tink back (= knitting backward, in other words: stitch for stitch un-knitting what you did). In that case, make sure to wind back your yarn on the separate balls to avoid it all tangling up. It’s also possible to find a bit in your color work that didn’t quite go according to the chart, way back or even after binding off. In that case, there are several options. You can, of course, consider it a design element. If it bothers you too much, don’t be hesitant to fix it for the eye by embroidering over it using the duplicate stitch technique. And I’ve got a tutorial for that!

duplicate stitch_4

There you have it: several color work tips to help you with working lovely color work projects!

Patreon logo

Thanks to my Patreon supporters for bringing you this freebie! Creating quality patterns and tutorials is a lot of work and resource-intensive. However, I find it important to give you free content like this tutorial. Thanks to the generous support of my Patreon supporters, I can make it happen. Thank you, patrons! Click here to join, or click here to read more about La Visch Designs on Patreon.

tutorial – knitting colorwork tips Read More »

lace for mom

Lace for Mom

The moment I showed my mom the yarn I used in this scarf, she said: “You know this is soooo my color?!” No problem mom, this one is for you. The delicate lace is based on traditional Estonian stitch patterns, which, of course, include nupps. My mom wouldn’t have it any different! Instructions for both traditional and easy nupps are included.

This design in size S was originally published in Knotions Magazine. This pattern, however, not only contains instructions for the peaked border on one of the long sides as pictured but also for a wider symmetrical version (size L). The instructions for the shawl are provided both fully charted and written out.


Pay what you want: (minimum €6.50)

Add to cart


Difficulty level

The Lace for Mom scarf is worked lengthwise and contains lace that is worked on the right side of the fabric only. Size L also requires grafting / Kitchener stitch. Stitches used include knit, purl, k2tog, skp, yo, a centered double decrease (sl2-k1-p2sso) and nupps. This pattern is suitable for the intermediate to advanced knitter.

Sizes and finished measurements

S (L) – finished dimensions: 29 (40) cm (11 ½ (15 ¾) inches) wide and 224 cm (88 ¼ inches) long, measured after blocking. Shawl pictured is size S.

Pattern details

  • Gauge: For the sample Lace for Mom shawl: 12.7 sts / 18.8 rows = 10 cm (4 inches) over body pattern knit with smaller size needles, measured after blocking. Gauge is however not critical for this design.
  • Pattern languages included: English and Dutch (Dit patroon omvat zowel een Nederlandse als een Engelse versie)
  • Digital PDF has 4 pages (letter size)

Materials

  • Yarn: 402 (603) m (440 (660) yds) Malabrigo Yarn Sock (100 % wool; 402 m (440 yds) per 100 g) in 806 Impressionist Sky. Substitute any wool fingering weight yarn of comparable thickness for a similar result.
  •  Size 5 mm (US 8) / 80 cm (32 inches) circular needles
  • One extra pair size 5 mm (US 8) / 80 cm (32 inches) circular needles for grafting, for size L only
  • Size 6 mm (US 10) / 80 cm (32 inches) circular needles for cast-on only
  • Yarn needle
  • 21 stitch markers to use in between lace repeats (optional)
  • Waste yarn, approx. 1 m (1.1 yds), for size L only
  • Crochet hook in a size equivalent to the small size knitting needles (optional, for easy nupps)

lace for mom Read More »

tutorial – circular cast-on

Circular cast-on - a tutorial by La Visch Designs

Casting-on for knitting in the round is usually a rather fiddly business. The circular cast-on method in this tutorial, unfortunately, isn’t any different in that respect. Still, when wanting the cast-on for a project knitted flat and in the round, this method gives a very nice and invisible start.

I think it’s ideal for things like top-down hats, center-out blankets or shawls, and the like. It’s pretty similar to the idea of starting a project with a magic ring in crochet. A big plus is that the ring can be tightened to close up the starting hole, once you’re well underway and past that fiddly starting stage.

In this tutorial I used a circular needle in the magic loop way, but (of course) double pointed needles (dpn’s) can also be used for the small-circumference start.

Materials

Besides yarn and circular knitting needles (or dpn’s), it’s also a good idea to use stitch markers to denote the corner stitches. I didn’t use them in this tutorial and it shows in the end result! If using circular needles, make sure the cable is long enough to do magic loop. In my experience, 80 cm / 32 inches or longer is needed for that.

Circular cast-on - a tutorial by La Visch Designs

The circular cast-on step-by-step

1. Make an overhand knot in your yarn as shown below in the picture.

Circular cast-on - a tutorial by La Visch Designs

2. Next, position your knitting needle as shown underneath the strand of your that goes to the ball of yarn.

Circular cast-on - a tutorial by La Visch Designs

3. Now insert the needle in the circle of yarn, yarn over and pull the loop through the circle. This makes a new stitch as shown below.

Circular cast-on - a tutorial by La Visch Designs

4. Now, yarn over again…

Circular cast-on - a tutorial by La Visch Designs

5. …. and (as in step 3) again insert the needle in the circle of yarn, yarn over and pull the loop through the circle. This makes a new stitch as shown below.

Circular cast-on - a tutorial by La Visch Designs

6. Repeat steps 3 and 4 as often as needed. In this example, I repeated another 2 times to get to a total of 8 stitches on my needle.

Circular cast-on - a tutorial by La Visch Designs

7. Now you can pull on the yarn tail to tighten up the cast-on circle. Don’t worry if it loosens up, later on, you can always tighten it again.

Circular cast-on - a tutorial by La Visch Designs

8. And now you can start knitting according to your pattern! This may also be a good time to insert any stitch markers needed, for the correct placement of the increases. In this example, I didn’t, which shows in the wonky placement of the yarn overs in the picture below. Still, the cast-on itself in the center can be seen pretty well, so there it is!

Circular cast-on - a tutorial by La Visch Designs
Patreon logo

Thanks to my Patreon supporters for bringing you this freebie! Creating quality patterns and tutorials is a lot of work and resource-intensive. However, I find it important to give you free content like this tutorial. Thanks to the generous support of my Patreon supporters, I can make it happen. Thank you, patrons! Click here to join, or click here to read more about La Visch Designs on Patreon.

tutorial – circular cast-on Read More »

beat the fug

Beat the Fug by La Visch Designs

Beat the Fug is a crescent-shaped shawl worked from the top-down. Inspired by the “Free-Wrench” novel by Joseph R. Lallo and the yarn dyed to match by Third Vault Yarns, it perfectly catches the steampunk vibe so wonderfully described in the story.

The shawl starts with a garter stitch tab. The body contains special shaping, which helps to avoid the “bump” in the upper edge of the shawl, so often present in crescent shawl designs. The lace in the border is knit on both right side and wrong side rows. The instructions for the border of the shawl are provided both fully charted and written out.


Pay what you want: (minimum €6.50)

Add to cart


Difficulty level

The Beat the Fug shawl starts with a modified garter stitch tab. Stitches used include knit, purl, k2tog, p2tog, skp, a centered double decrease, yo and m1L and m1R increases. This pattern is suitable for the intermediate knitter.

Sizes and finished measurements

Size S (L) finished dimensions: Wingspan of 152 (175) cm (60 (69) inches) and a depth of 40 (50) cm (15 ¾ (19 ¾) inches), measured after blocking. The shawl shown is in size L.

Pattern details

  • Gauge: For the sample shawl measured after blocking: 19 sts / 23 rows = 10 cm (4 inches) in stockinette stitch. Gauge is not critical for this design, but a loose gauge is strongly advised.
  • Pattern languages included: English and Dutch (Dit patroon omvat zowel een Nederlandse als een Engelse versie)
  • Digital PDF has 6 pages (letter size)

Materials

  • Yarn: Third Vault Yarns Companion 4-ply (100% Sw Merino; 400 m (437 yds) / 100 g) in the following colors and amounts: C1: 140 (200) m (153 (219) yds) / 35 (50) g in The Windbreaker, and C2: 260 (400) m (284 (437) yds) / 65 (100) g in Well Fug!
  • Size 4 mm (US 6) / 80 cm (32 inches) circular needles
  • Yarn needle
  • 2 stitch markers to mark the center of the shawl
  • Stitch markers for the lace section (optional)

beat the fug Read More »