Indie Design Gift-A-Long 2016
![]()
It is finally Gift-A-Long time again! I’m very excited to announce that the Gift-A-Long 2016 (or GAL for short) has started. This year I’m of course also participating again as both a designer and knitter/crocheter. However, I’m still trying to decide what patterns to buy and make myself.
What is the Gift-A-Long 2016?
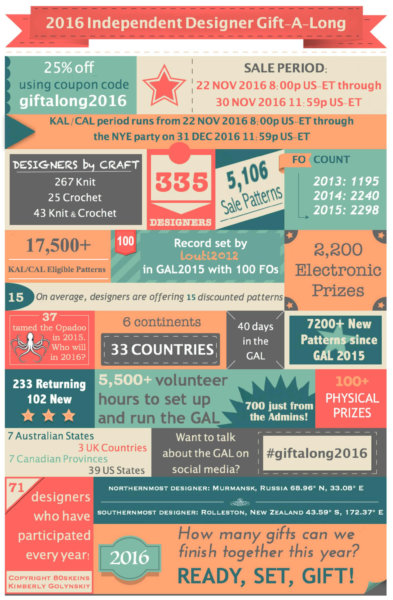
The Indie Design Gift-A-Long is a 6-week long international event hosted in the Indie Design Gift-A-Long Group on Ravelry. Thousands of knitters and crocheters come together in Knit-A-Longs (KAl’s) and Crochet-A-Longs (CAL’s). The goal is to get our holiday knitting/crocheting done using patterns designed by participating independent designers. In the statistics overview below you can see (besides are fun facts) that a whopping 335 designers participate!
From November 22, 2016, at 8:00 pm US EST to December 31, 2016, at midnight US EST there are fun games, contests, and 8 KAL/CAL’s. The KAL/CAL’s are a wonderful way to make your gifts, either for yourself or for others. Lot’s of chatting and cheering are also a big part of the GAL because enthusiastic company makes those needles and hooks really fly.
There are multiple categories for projects, and chat threads for each of these. Any design by a participating designer is eligible for joining in. Any paid (not free) pattern from these designers is eligible for winning prizes. Prizes are won through fun games, random draws, and trivia questions. And splendid prizes they are! In this thread, there is an overview of physical prizes donated.
The GAL sale
In addition to the KAL/CAL’s, there is of course also the GAL sale. The Gift-A-Long 2016 kicks off with the Giant Gift-A-Long Sale: From November 22nd, 8 pm EST to November 30th, 11:59 EST, participating Indie Designers are offering between 5 and 20 of their independently published patterns at 25% off. To take advantage of the sale, use the coupon code: giftalong2016.
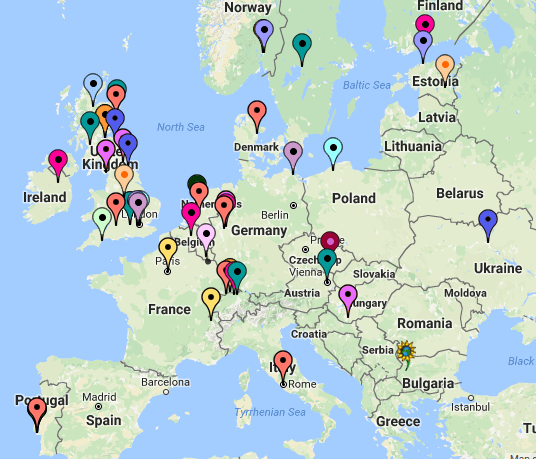
A full list of participating designers can be found here. In the picture below you can see some of the participating designers by location. The complete map with all Gift-A-Long 2016 designers is here. A wonderful handy searchable bundle of all sale patterns is also available.
In conclusion: the Gift-A-Long is a wonderful event that you really can’t miss. Most of all because it is just soooo much fun.
See you in the GAL!
Indie Design Gift-A-Long 2016 Read More »