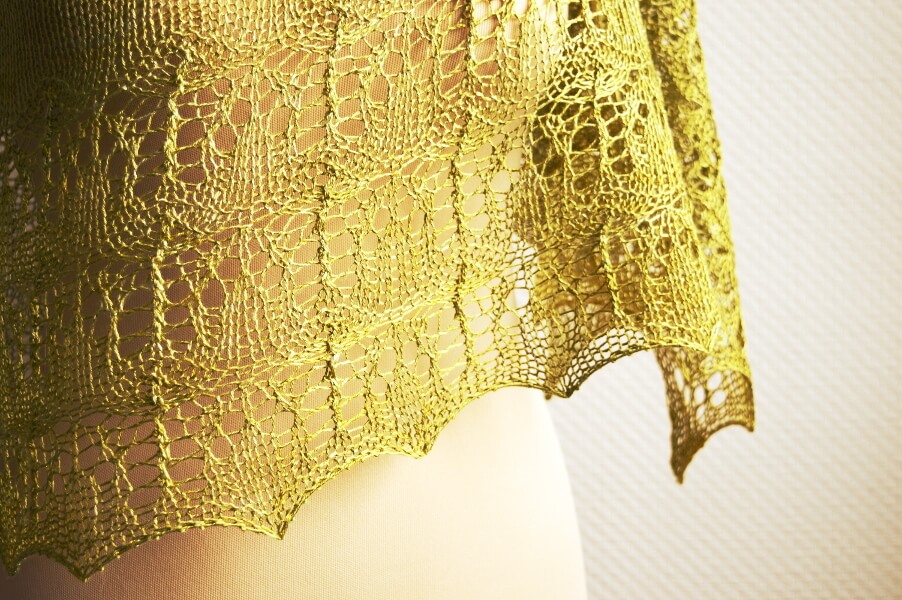
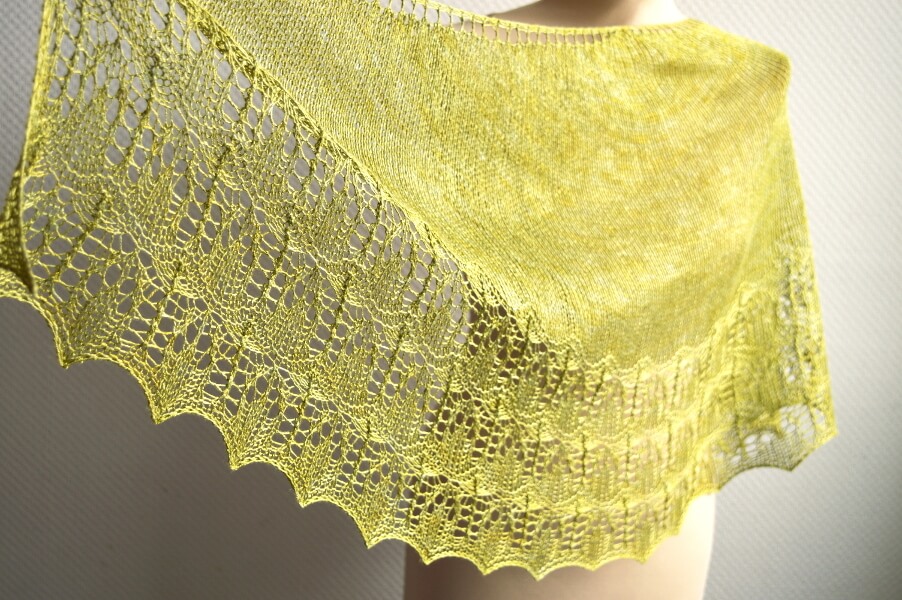
Olivijn is a crescent-shaped shawl worked from the top-down. Its stockinette body will let that special skein of fingering weight yarn shine, the lace edging adds a special touch of luxury.
Start this shawl with a garter stitch tab, then work the lace in the border on both right side and wrong side rows. The instructions for the body and the border of the shawl are provided both fully charted and written out.
Pay what you want: (minimum €6.50)
€
Difficulty level
Stitches used include knit, purl, k2tog, skp, yo, p3tog and a centered double decrease. This pattern is therefor suitable for the intermediate to advanced knitter.
Size and finished measurements
Olivijn has a wingspan of 152 cm (60 inches) and a depth of 47 cm (18 ½ inches), measured after blocking.
Pattern details
Written for a gauge of 18 sts / 23 rows = 10 cm (4 inches) over stockinette after blocking. Gauge is not critical for this design, but a loose gauge is strongly advised.
Pattern languages included: English and Dutch (Dit patroon omvat zowel een Nederlandse als een Engelse versie).
Digital PDF has 3 pages (A4 size).
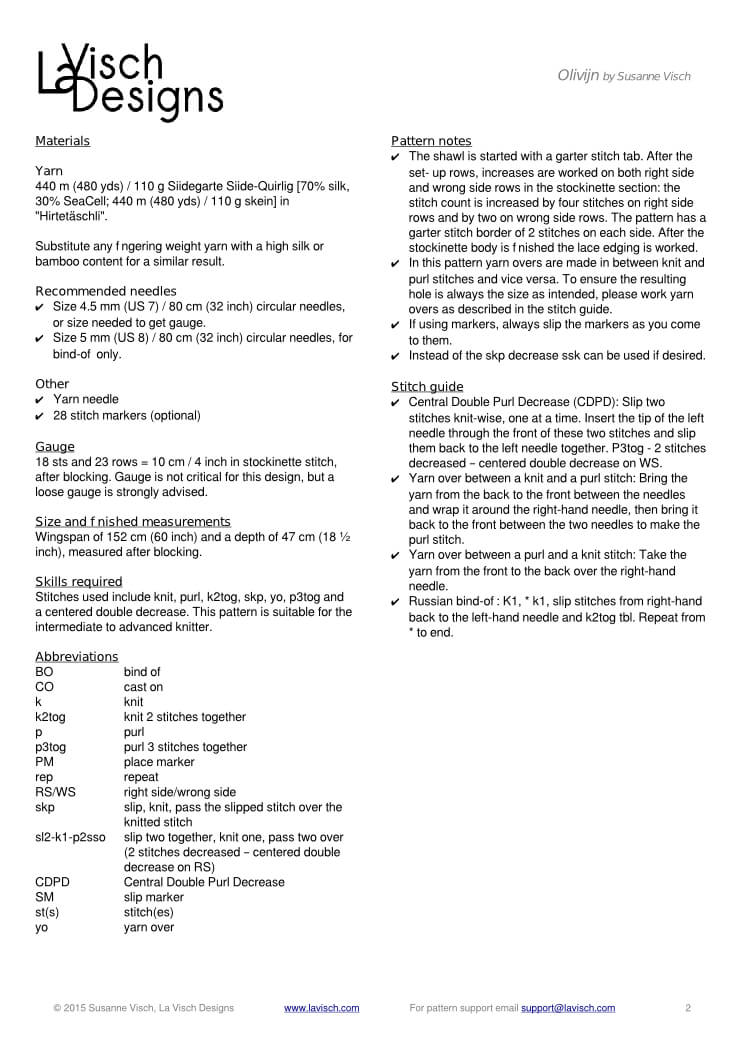
Materials
440 m (480 yds) / 110 g Siidegarte Siide-Quirlig [70% silk, 30% SeaCell; 440 m (480 yds) / 110 g skein] in “Hirtetäschli”. Substitute any fingering weight yarn with a high silk or bamboo content for a similar result.
Size 4.5 mm (US 7) / 80 cm (32 inches) circular needles, or size needed to get gauge.
Size 5 mm (US 8) / 80 cm (32 inches) circular needles, for bind-off only.
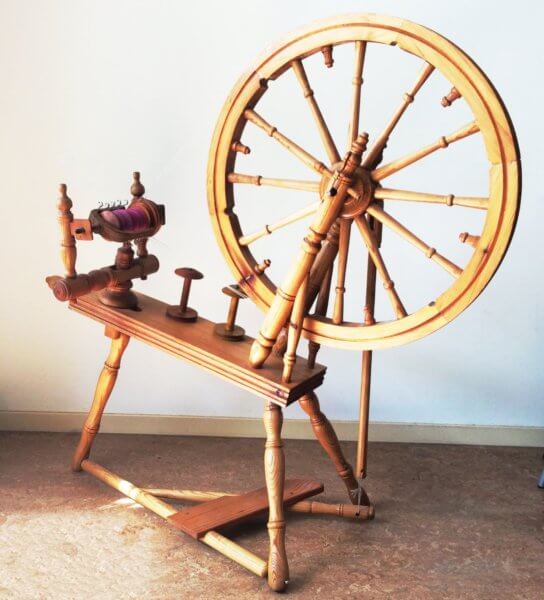
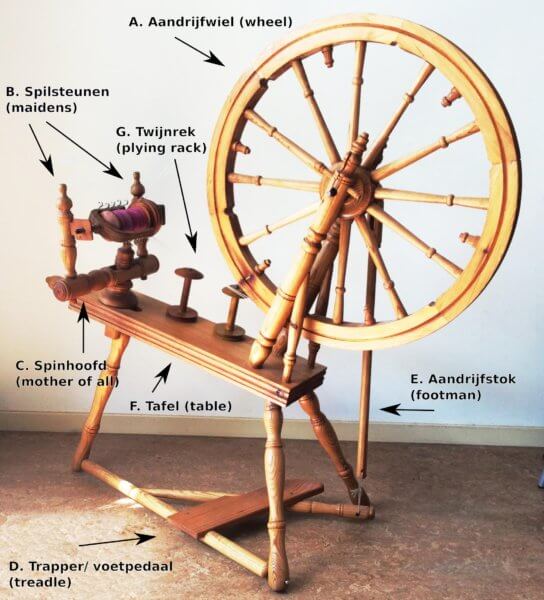
Spinning wheels, who doesn’t know them? Even if it is just from fairy tales like Sleeping Beauty and Rumpelstiltskin. Because of the fairy tales spinning wheels are also the best-known method to make your own yarn for knitting, crochet or weaving. Spinning wheels come in lots of different shapes, sizes and also have many different components. With this post, I want to make you a bit more familiar with the latter.
The anatomy of a spinning wheel
Due to the large differences between wheels, the various parts are sometimes shaped differently or located in a slightly different spot. The following components can, however, be found in most spinning wheels, in one form or the other. Much of the information on spinning and spinning wheels online, is in English. Being Dutch I found that a lot of information is not available in my own language. Therefore I have I included both Dutch and English in the notes below about the various parts and components.
A. Wheel (aandrijfwiel): The wheel that spins around and doing so puts the other parts of the spinning wheel in motion. B. Maidens (spilsteunen): The vertical supports that hold the flyer and bobbin. C. Mother of all (spinhoofd): The horizontal bar on which the maidens, flyer, bobbin and tension screw are attached. D. Treadle (trapper/voetpedaal): The treadle that lets you bring the drive wheel in motion. Some spinning wheels have one treadle (single treadle wheels), other versions have two to be used with both feet (double treadle). E. Footman (aandrijfstok): The part that connects the treadle to the drive wheel, causing it to rotate when treadling. F. Table (tafel): This is the central component of a spinning wheel, where everything is built upon which gives a wheel its structure. G. Plying rack (twijnrek): Raised pins that are used to place bobbins filled with spun singles on, in order to ply them together in a plied yarn. They can of course also be used to store additional bobbins when not plying.
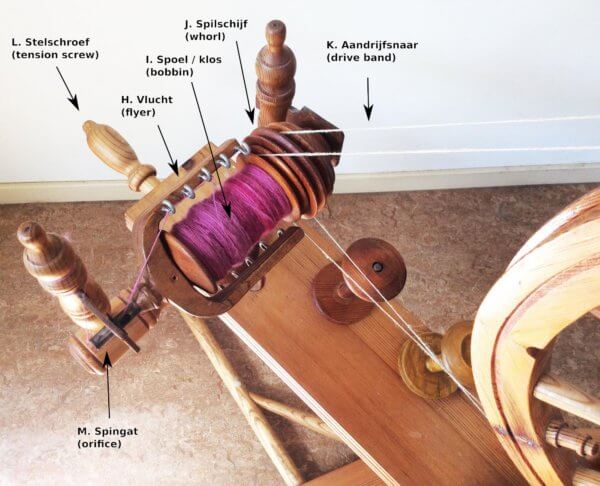
H. Flyer (vlucht): U-shaped component with hooks at one or both sides of the arm of the U. The hooks are used to divide the yarn neatly over the bobbin. The flyer is rotated by the drive belt, causing rotation (twist) to insert into the wool. The fibers themselves are relatively weak but combined in this manner, they are much stronger. I. Bobbin (spoel/klos): The bobbin is placed on the flyer spindle and rotates, along with the flyer. Here, the yarn is wound up, when sufficient twist has entered the wool. J. Whorl (spilschijf): A pulley which is placed on the spindle, is connected with the flyer, and is driven by the drive belt. The different dimensions of the grooves in the whorl determine how fast the wheel is spinning and have an important impact on the ratio of the spinning wheel. With ratio is meant how many times the flyer goes around with one turn of the wheel. The higher the number, the faster the wheel spins. K. Drive belt (aandrijfsnaar): A cord placed around the wheel and whorl, which thus transfers the rotation of the wheel onto the other parts of the wheel. Modern spinning wheels typically have a flexible plastic drive belt, I use hemp packaging twine on mine. L. Tension screw (stelschroef): This part is used to put tension on the drive belt by moving the Mother of All. M. Orifice (spingat): The opening at the end of the flyer spindle, where the wool goes through before it is wound through the flyer hooks onto the bobbin.
In this post, I’ll tell you about the various types of spinning wheels.
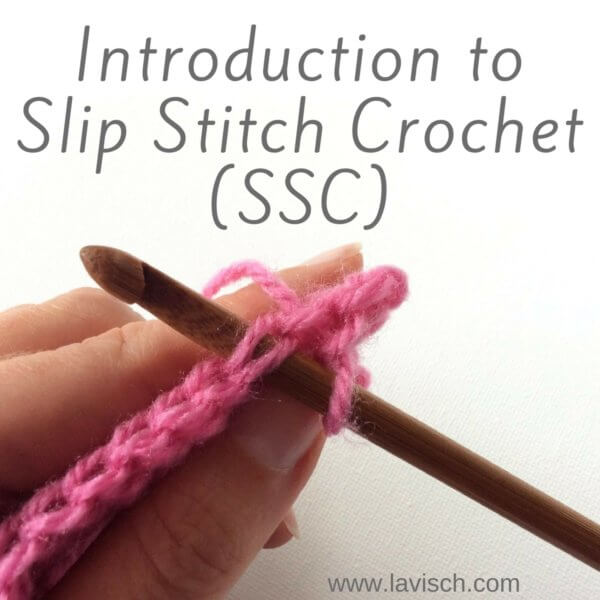
As you are probably aware, there are lots of different crochet stitches. The basic stitches (in US terminology) being single crochet (sc), half double crochet (hdc), double crochet (dc) and the slip stitch (slst). What is perhaps less known is that there is a very special form of crochet, which only uses slip stitches. This is called Slip Stitch Crochet, abbreviated as SSC.
Depending on how the hook exactly is inserted into the stitch, the result can look very similar to knitting. The stitches can look a lot like stockinette stitch, and the fabric is thinner, more flexible and requires less yarn for a similar surface than with traditional crochet.
History
Slip stitch based crochet has been around for a very long time. Many believe it is actually the oldest form of crochet. Fact is that it was and is traditionally much practiced in several European countries, including Norway, Sweden, and Bosnia. This particular type of crochet is therefore also known as “Bosnian crochet”. However, traditional Bosnian crochet is mainly done in the round, where the work at the end of a round is not reversed. In modern versions of slip stitch crochet, the work is reversed, if desired.
How to work SSC?
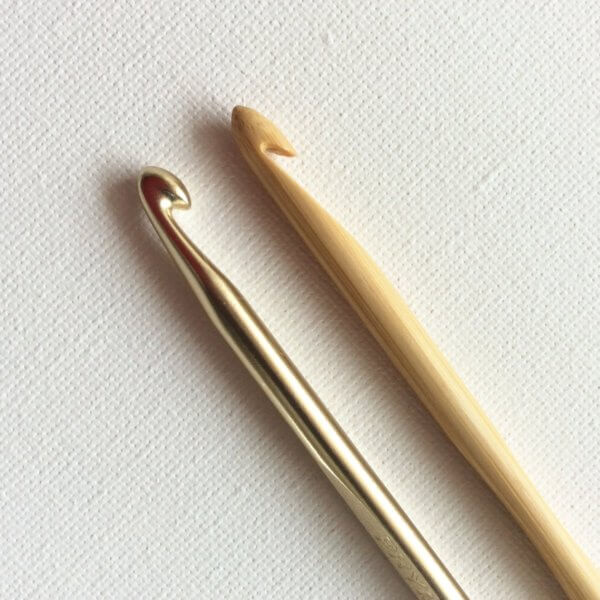
First, it is important that you use the right type of crochet hook. The kind where the entire head of the needle is cylindrical with a “cut out” to make a hook shape, as with the above-depicted bamboo crochet hook works best. These are also called “in-line” hooks. With the other type, it is more difficult to insert the hook into the correct part of the stitch.
A big difference between regular crochet and SSC is the size of the crochet hook needed. A much larger size than usual is required to ensure that the work does not end up too thick and stiff. Take for example worsted weight yarn where the label recommends needles in size 4-4.5 mm. For that yarn, a crochet hook in a size of approximately 6 mm would be the better size for SSC.
With regular slip stitches, the hook is usually under both loops of the stitch from the previous row. With SSC the hook can also be placed under only one of the loops. The exact orientation and direction determine what the stitch and thus the resulting work will look like. Variables here are front/back loop, inserting from the front to back or from back to front and yarn in front of the work vs yarn at the back of the work.
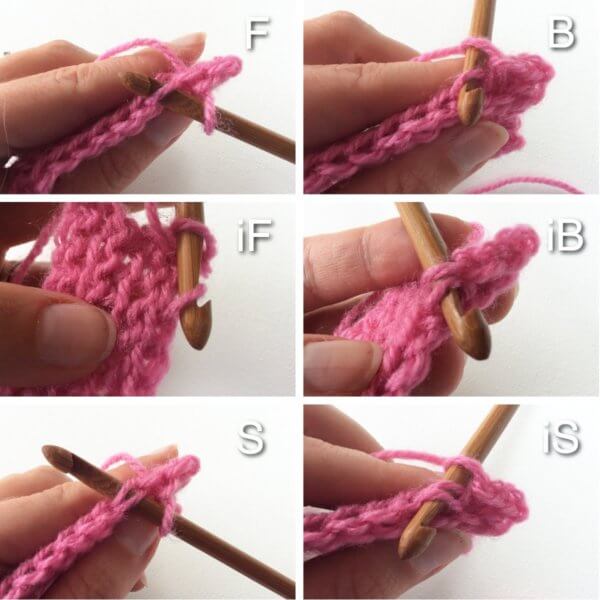
In the photo below you can see the differences between the six basic stitches in slip stitch crochet:
The basic stitched explained
F (front loop only slip stitch) Hold the yarn behind the work and the hook. Insert the needle from front to back under the front loop of the stitch, yarn over and pull the yarn through both loops on the hook.
B (back loop only slip stitch) Hold the yarn behind the work and the hook. Insert the needle from front to back under the back loop of the stitch, yarn over and pull the yarn through both loops on the hook.
iF (inverse front loop only slip stitch) Hold the yarn in front of the work and the hook. Insert the needle from back to front under the front loop of the stitch, yarn over and pull the yarn through both loops on the hook.
iB (inverse back loop only slip stitch) Hold the yarn in front of the work and the hook. Insert the needle from back to front under the back loop of the stitch, yarn over and pull the yarn through both loops on the hook.
S (slip stitch) This is a regular slip stitch: Hold the yarn behind the work and the hook. Insert the needle from front to back below both loops of the stitch, yarn over and pull the yarn through the loops on the hook.
iS (inverse slip stitch) This is a regular slip stitch worked backward: Hold the yarn behind the work and the hook. Insert the needle from back to front under the two loops of the stitch, yarn over and pull the yarn through the loops on the hook.
Examples
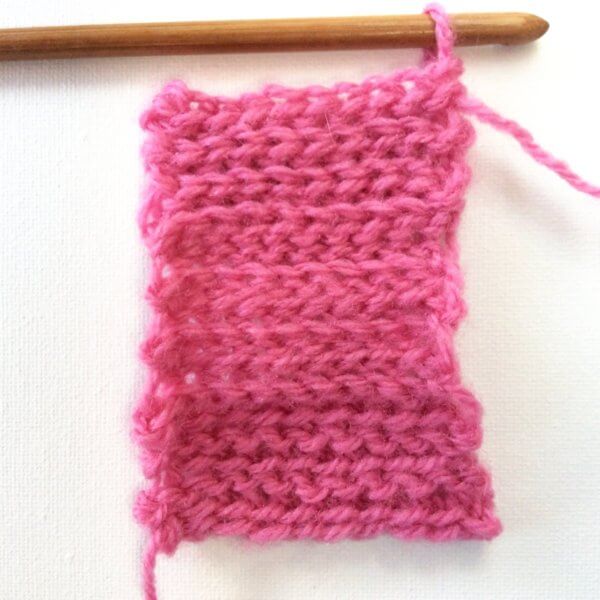
In this swatch, I’ve tried out three different stitch patterns. These can all be made with combinations of the basic SSC stitches. The pictures show both sides of the work:
A: Looks very much like garter stitch and the resulting fabric does not curl. This is made by working F every row.
B: Looks very much like stockinette stitch in a sideways orientation, the fabric curls up (just like stockinette stitch). It can be made by alternating rows in F and iB.
C: Rib stitch: because of its high elasticity, this pattern is very suitable for cuffs and hems. This can be made by working every row in B.
And that’s how you work slip stitch crochet! Although I still have to work on my edges, looking at the swatch below…
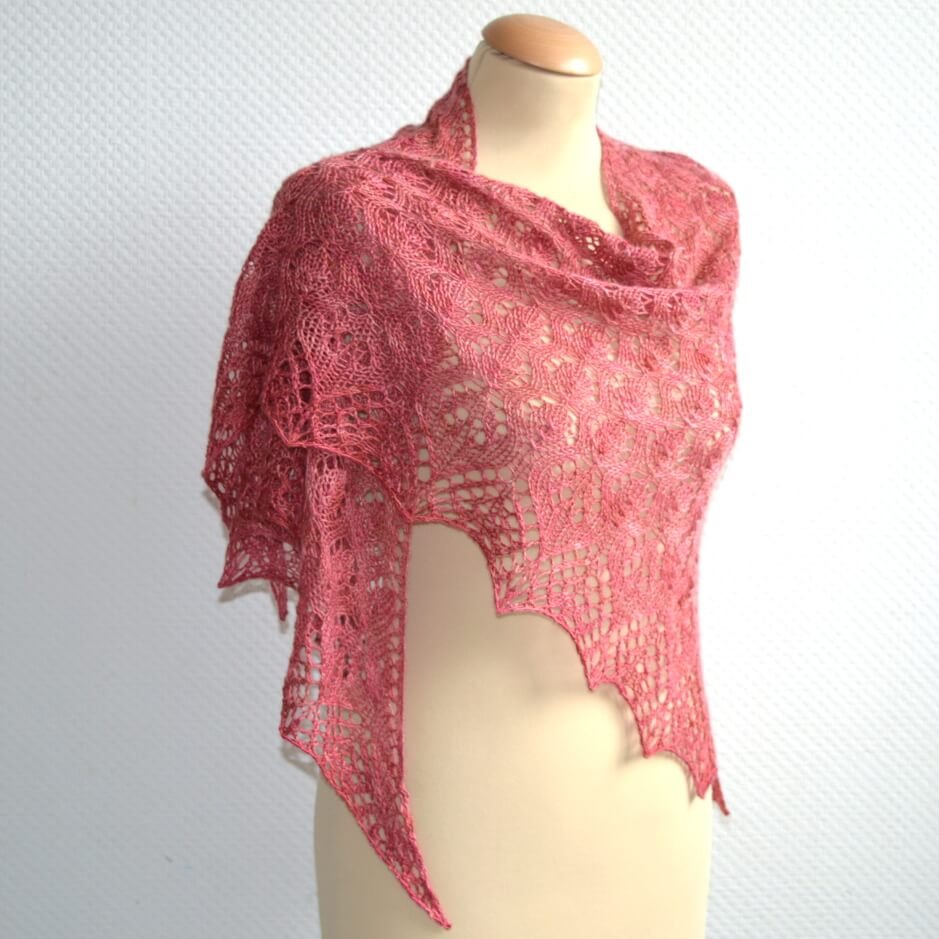
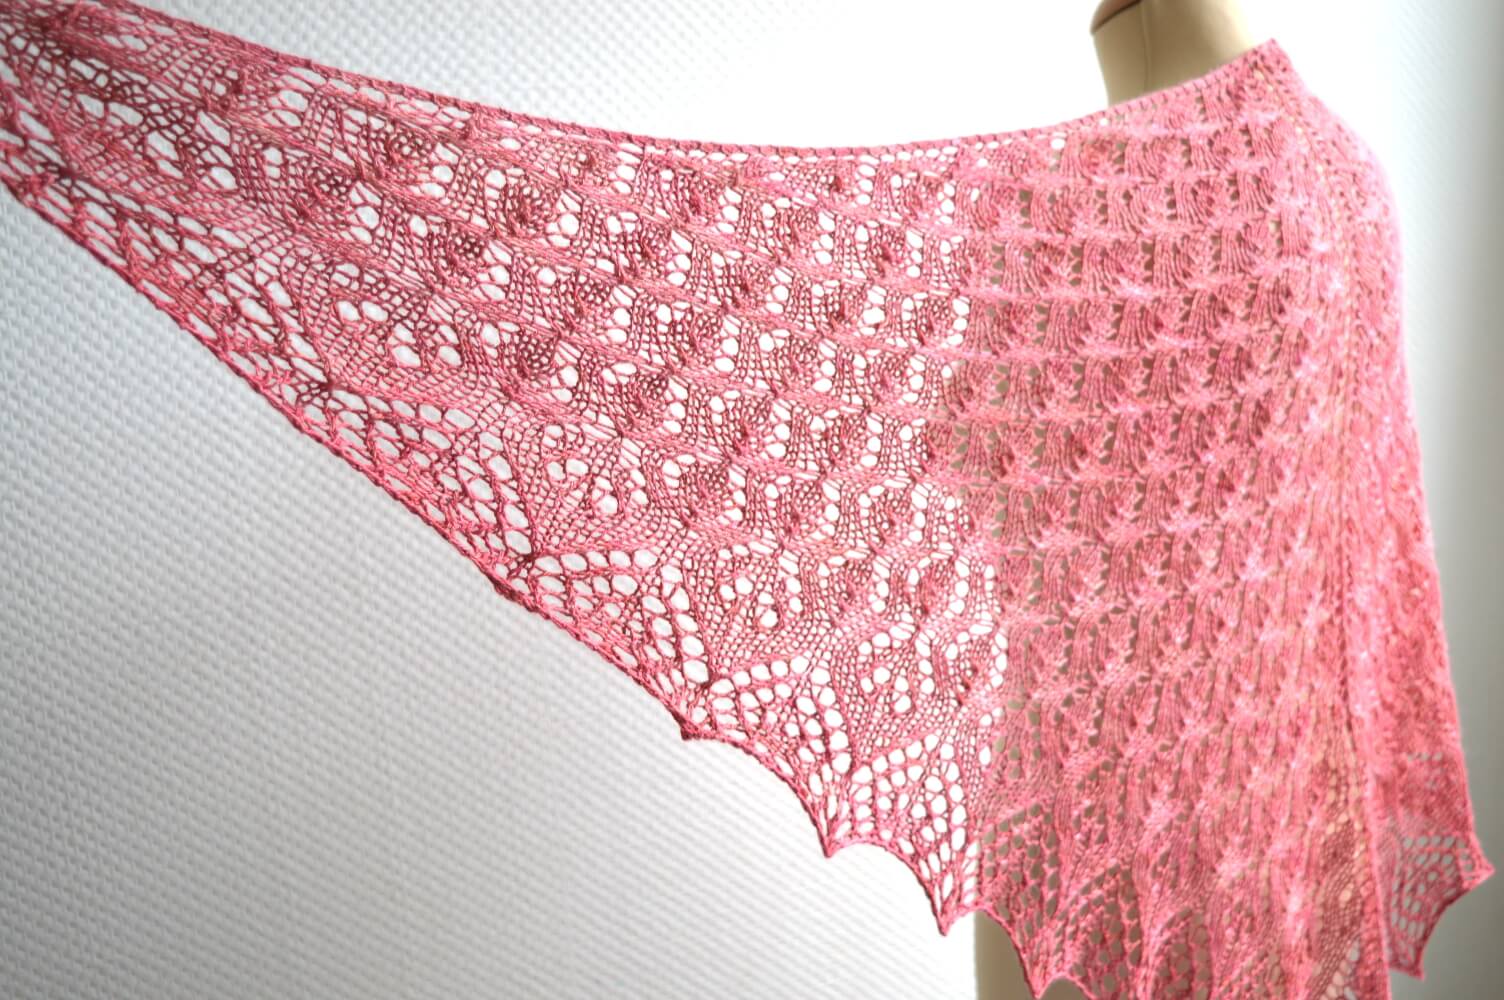
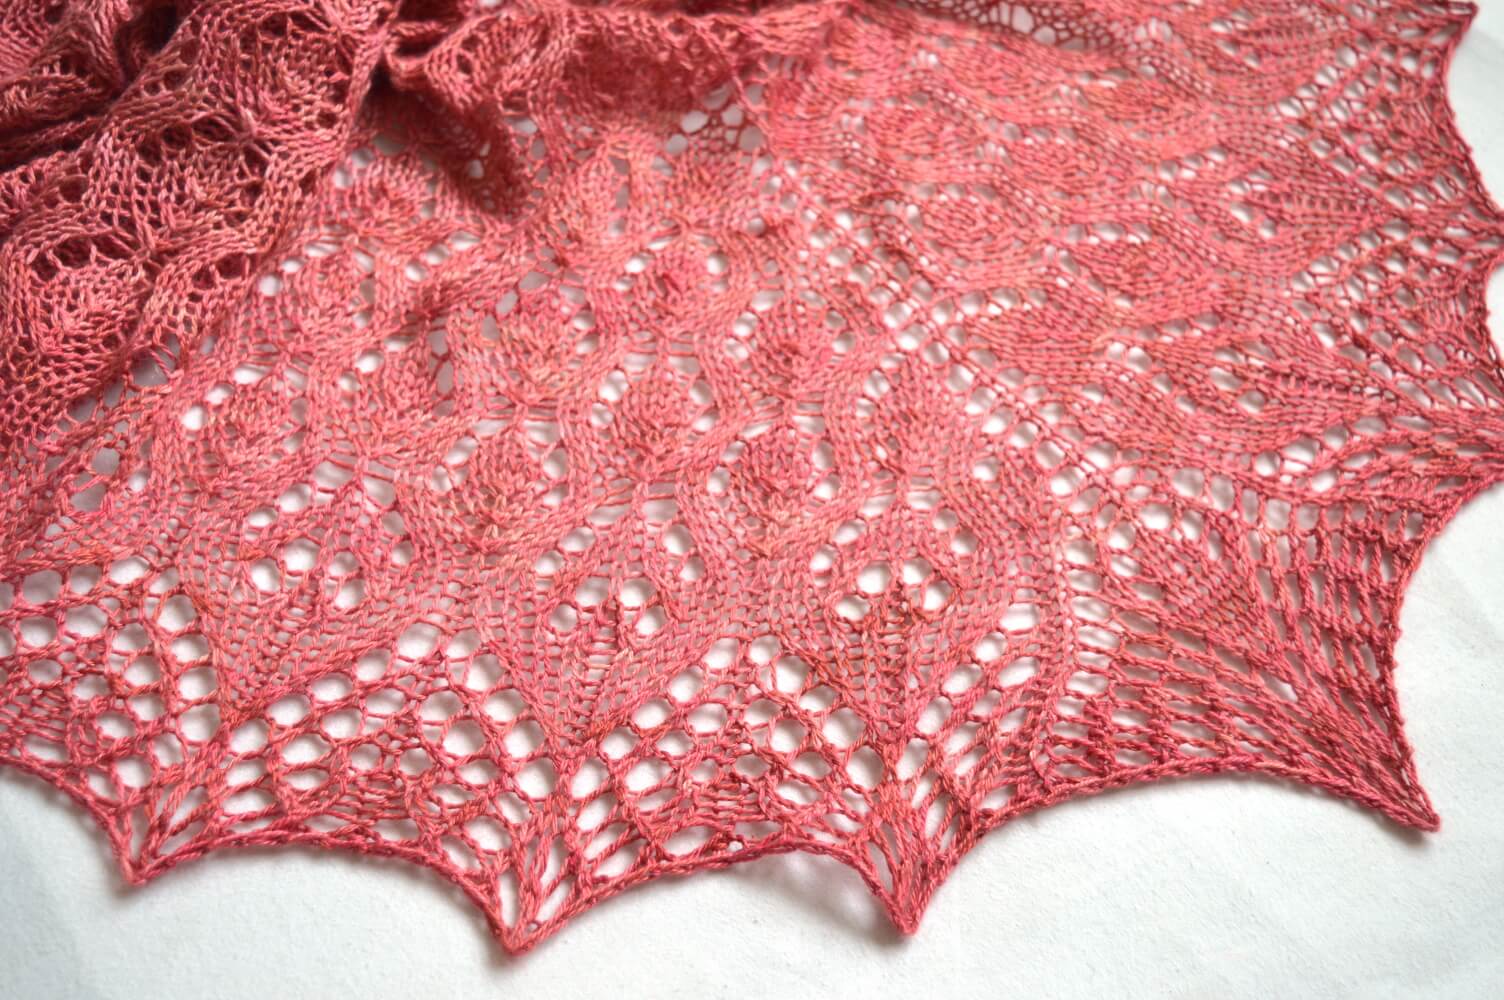
Lelie is an airy lace shawl with a beautiful and intricate stitch pattern of flowing leaves blooming into lovely flowers. Evoking feelings of spring and summer this shawl is a perfect choice to dress up that lovely outfit.
This shawl is knitted from the top-down in one piece, starting at the neck edge with a garter tab. The instructions for the body and the border of the shawl are provided both fully charted and written out.
Lelie has a wingspan of 170 cm (67 inches) and a depth of 70 cm (27 ½ inches), measured after blocking.
Pattern details
Written for a gauge of 13.6 sts / 26.4 rows = 10 cm (4 inches) over body pattern after blocking, gauge is however not critical in this design.
Pattern languages included: English and Dutch (Dit patroon omvat zowel een Nederlandse als een Engelse versie)
Digital PDF has 6 pages for the English version and 7 pages in the Dutch version (letter size)
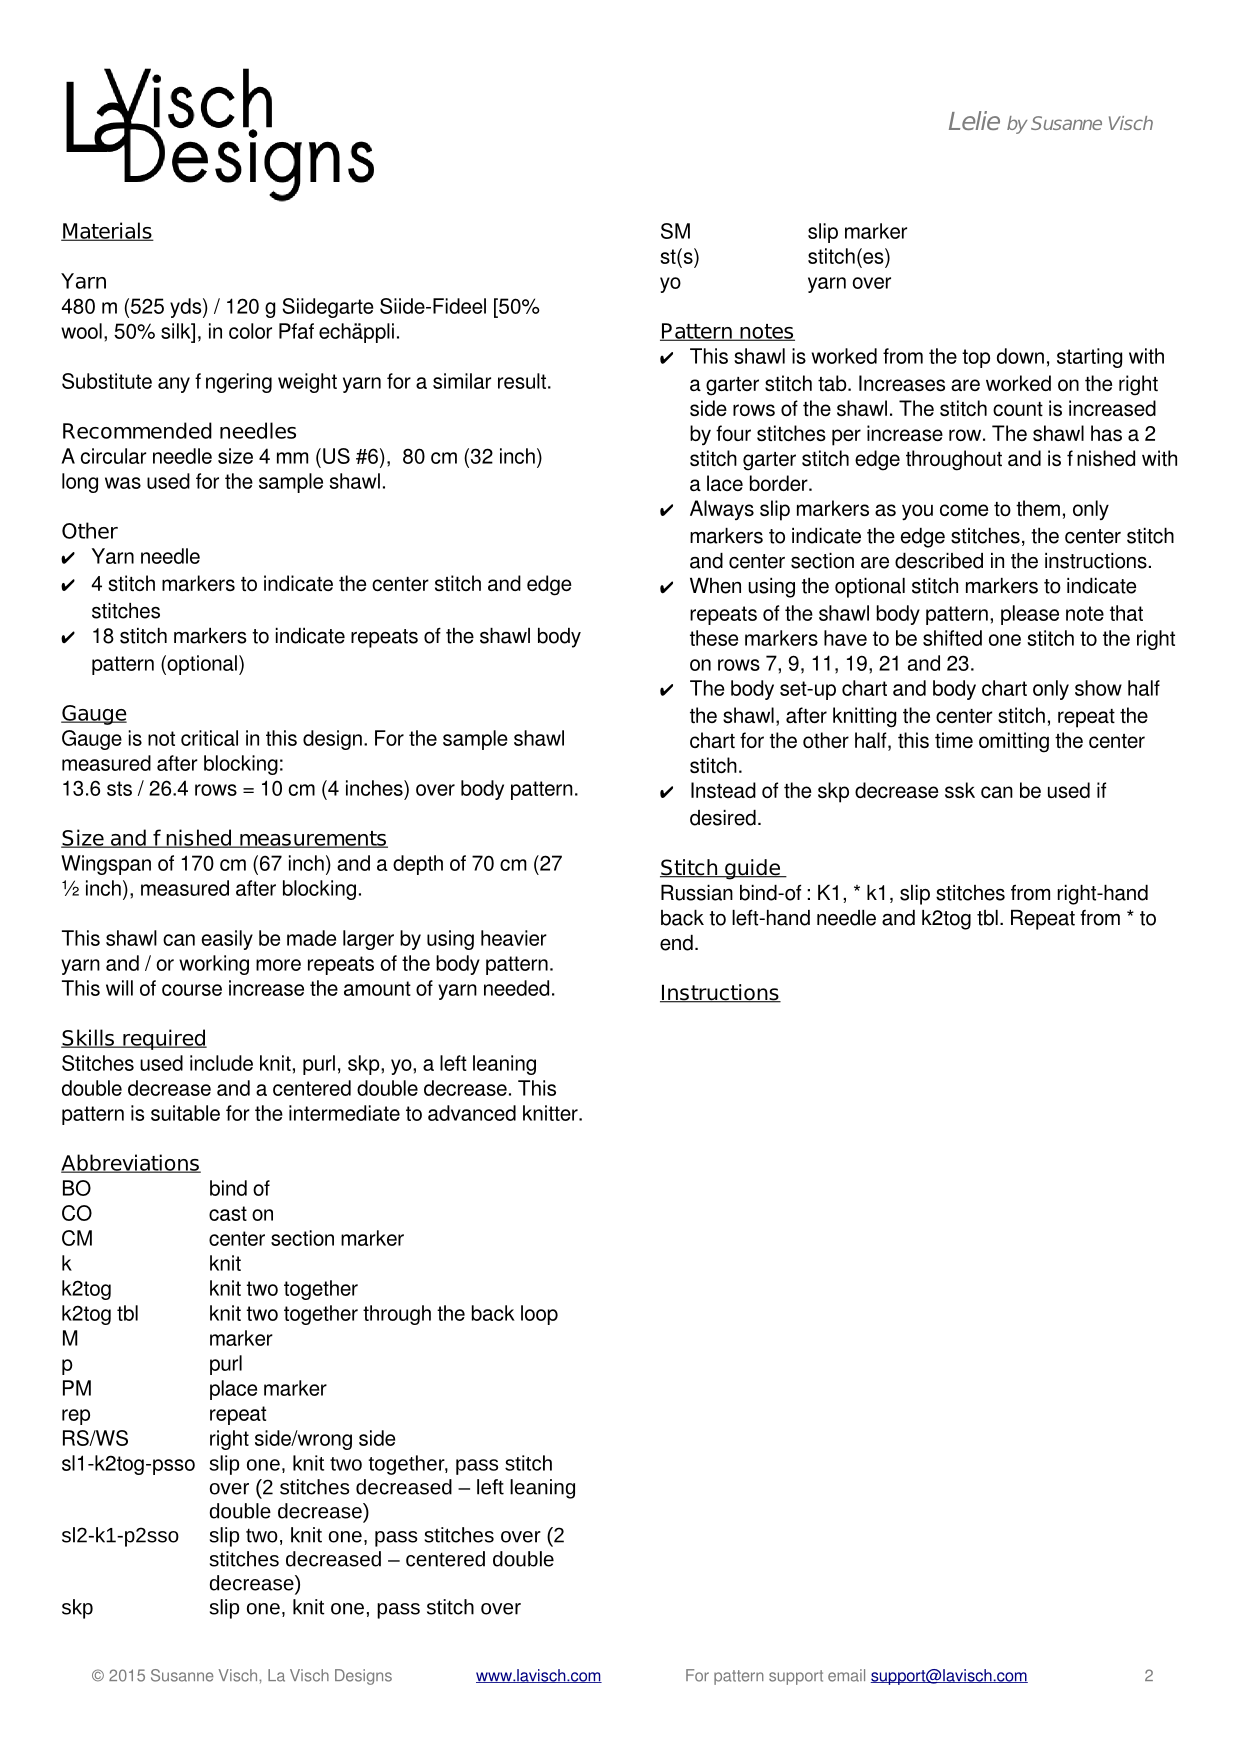
Materials
480 m (525 yds) / 120 g Siidegarte Siide-Fideel [50% wool, 50% silk], in color Pfaffechäppli. Substitute any fingering weight yarn for a similar result.
A circular needle size 4 mm (US 6), 80 cm (32 inches) long was used for the sample shawl.
Yarn needle
4 stitch markers to indicate the center stitch and edge stitches
18 stitch markers to indicate repeats of the shawl body pattern (optional)
It is quite possible that you are not the only one in your immediate family, who knits or crochets. Perhaps a mother who likes to click the needles. Or maybe a grandmother who regularly made you a sweater when you were little. In this blog I want to share a bit of my personal knitting history with you.
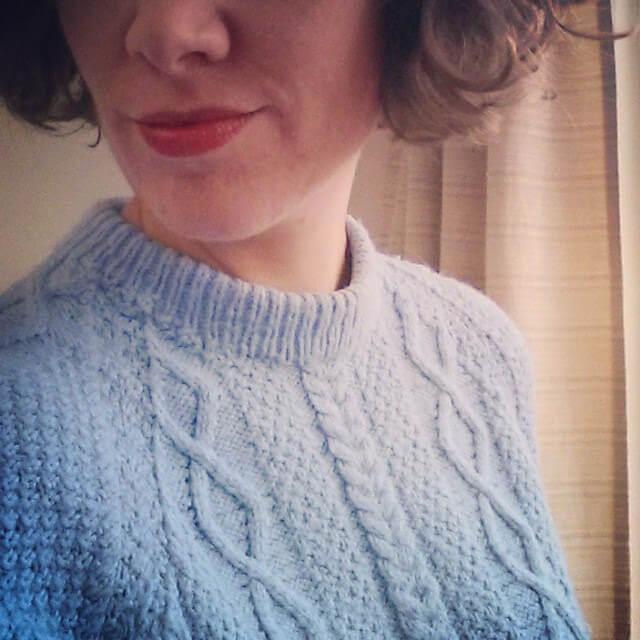
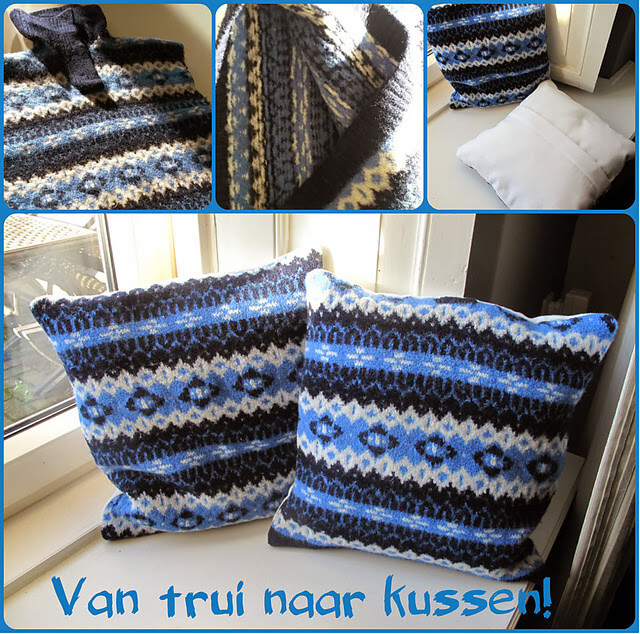
My grandmother was a good knitter. Unfortunately I haven’t experienced this first hand, because she died very young, only a couple of weeks after I was born. All these years my mother had been saving a big pile of sweaters made by my grandmother. Then, about 35 years later my mom visited me and brought along all these sweaters with the question if I would like some. The rest she would finally let go.
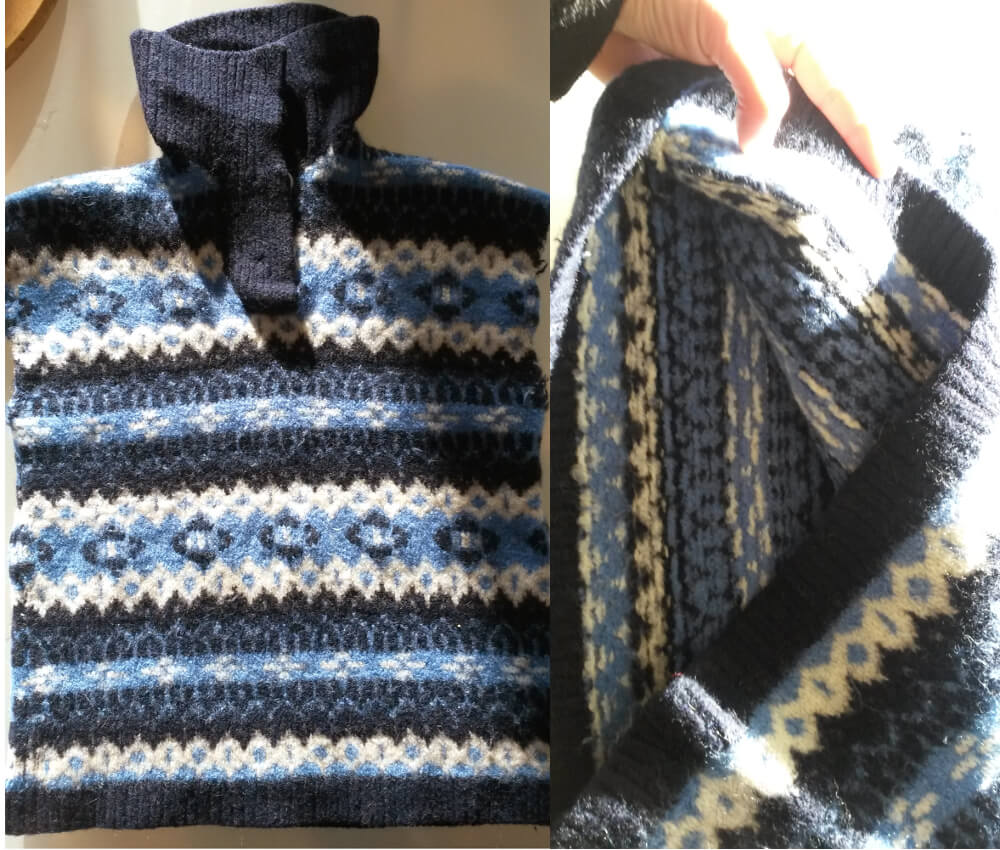
One of the sweaters really does suit me, is very much my style and one I have since worn every winter. That’s the sweater you see pictured above. One of the other sweaters was not wearable for me, but so beautifully made that I could not find it in my heart to throw it out. A gorgeous fair isle sweater made in several shades of blue.
And suddenly I had the wonderful idea to use this sweater to make something for my mother, so she would still have a tangible reminder of her mother’s knitting. My mother did keep these sweaters for all these years for a reason after all. My thoughts went out to making cushions, with the front of each cushion consisting of a panel of this sweater.
In preparation I had undone all the seams and felted the sweater panels. However, once it came down to cutting the cushion pieces and sewing them I got cold feet… I have absolutely no experience with sewing and was terrified to ruin this irreplaceable piece of felt. After some thinking I put a note about it with a plea for help in the”DutchKarma Swap Group” on Ravelry. A very sweet lady came to my rescue and transformed my grandmother’s sweater into these lovely pillow covers:
And my mother? She did not expect this gift at all and was extremely happy with this piece of our shared knitting history!
Many knitting patterns do not consist of rectangles but have a different shape. Think of a hat or a triangular shawl. To make contours in your work, you can make it wider by increasing your number of stitches, and narrower by decreasing them. When knitting lace both increases and decreases are indispensable. Knowing about knitting M1L and M1R increases, therefore, comes in very handy.
Being able to work a wide variety of increases is, therefore, a very important skill for a knitter. In this post, I’m going to show you how to make increases by lifting the horizontal thread between the stitch just knit and the next one. These increases are referred to as “make one left” (abbreviated M1L) and “make one right” (abbreviated M1R).
Left? Right?
Now you may wonder what is meant by “left” and “right” in this context. Depending on how exactly you make the increase, it leans to the left or to the right, relative to the surrounding “normal” stitches. This can be very useful in, for example, a sweater where increases on both sides of the neck opening are needed. In this particular case, it may be visually pleasing to be symmetrical.
Sometimes there is no indication of a direction given in the pattern, usually denoted by plain “M1”. If that is the case, you can choose which version you like best, or easiest to make.
Knitting a M1R increase step by step
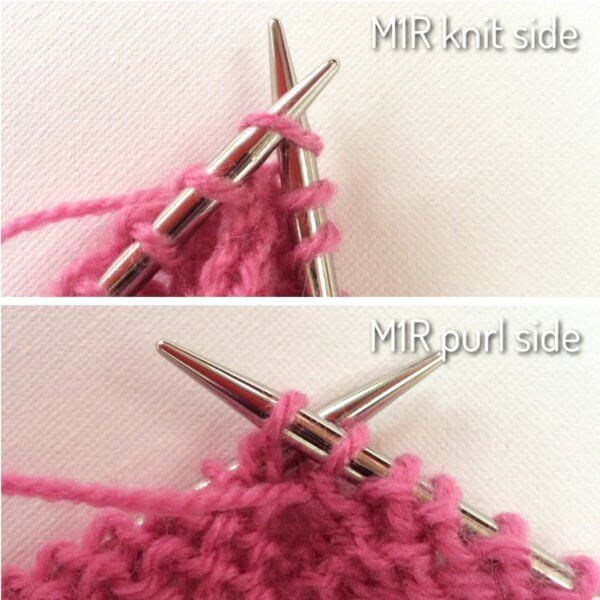
In this variation, you increase by lifting the thread between the stitch just knit and the next one from the back with your left needle, then knit (RS) or purl (WS) into the front of the loop. The resulting extra stitch leans to the right.
1. Lift the thread between the stitch just knit and the next one from the back with your left needle.
2. Knit (RS) or purl (WS) into the front of the loop.
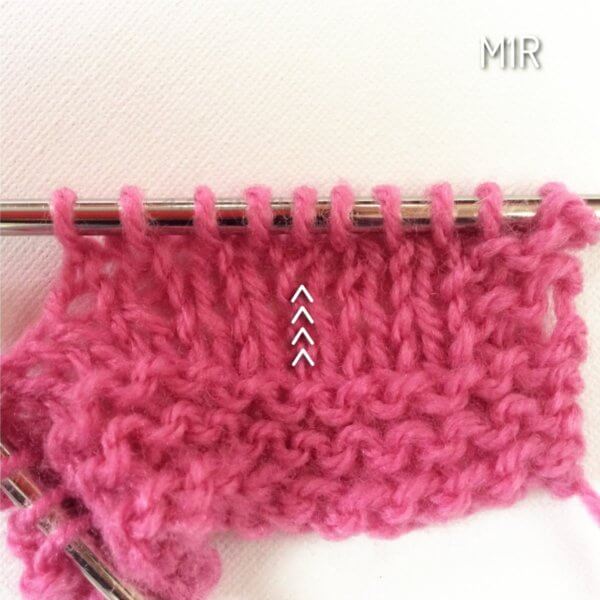
3. The result of the right-leaning M1R.
Knitting a M1L increase step by step
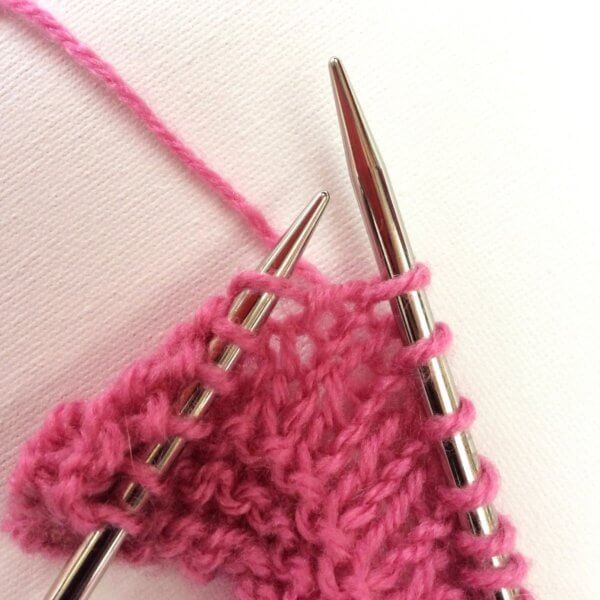
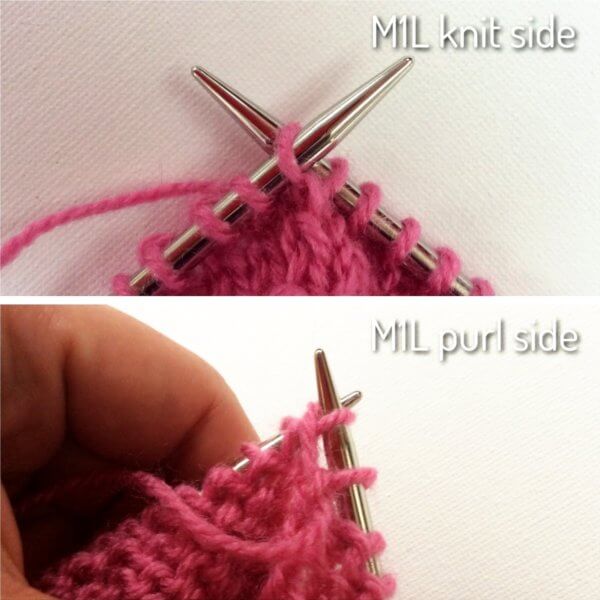
In this variation, you increase by lifting the thread between the stitch just knit and the next one from the front with your left needle, then knit (RS) or purl (WS) into the back of the loop. The resulting extra stitch leans to the left.
1. Lift the thread between the stitch just knit and the next one from the front with your left needle.
2. Knit (RS) or purl (WS) into the back of the loop. The latter may be a bit challenging, but as with everything practice makes perfect.
3. The result of the left-leaning M1L.
And this is how knitting M1L and M1R increases is done!
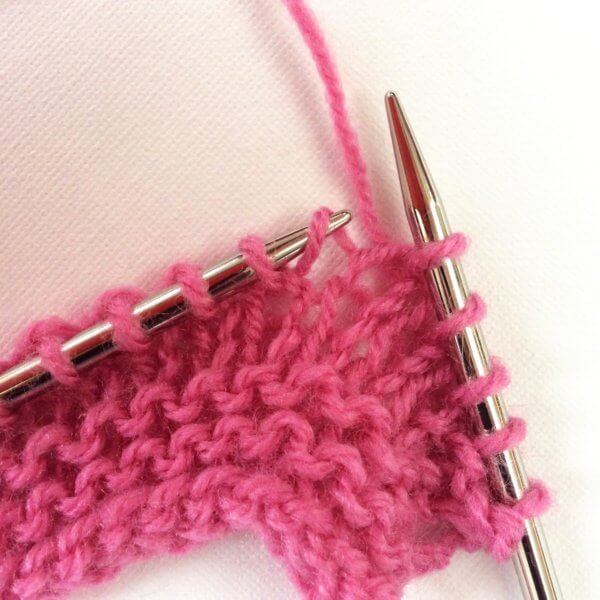
The M1 increase really is one of my favorites, not in the least because they give an almost invisible result. See for example in the picture below. In this small swatch, there are three increase rows worked every other row, at a distance of 3 stitches from the garter stitch edge.
Considerations when extreme knitting When knitting a pattern on such a large scale, there are several things that have to be taken into account. For example, it is often not possible to use a large stitch pattern where one repetition requires a large number of stitches and rows: unless you are making a blanket your piece is very likely just not big enough to knit one of multiple repeats of the pattern.
In addition, the impact of extremely large stitches is on its own already very big. Adding a complex stitch pattern to that can be just too much for the eye. A simple stitch pattern with a limited number of stitches and rows is therefore my motto.
Extreme knitting and lace Lace patterns are indeed very beautiful, but you have to remember you that if you knit with very thick yarn and big needles, the holes in your work will also be very large. This of course does not have be a problem, depending on the type of work you want to do.
However, it is something you do need to take into account, because the effect with a tension of 20 stitches over 10 cm / 4 inch is very different from that with a tension of 2 stitches per 10 cm / 4 inch.
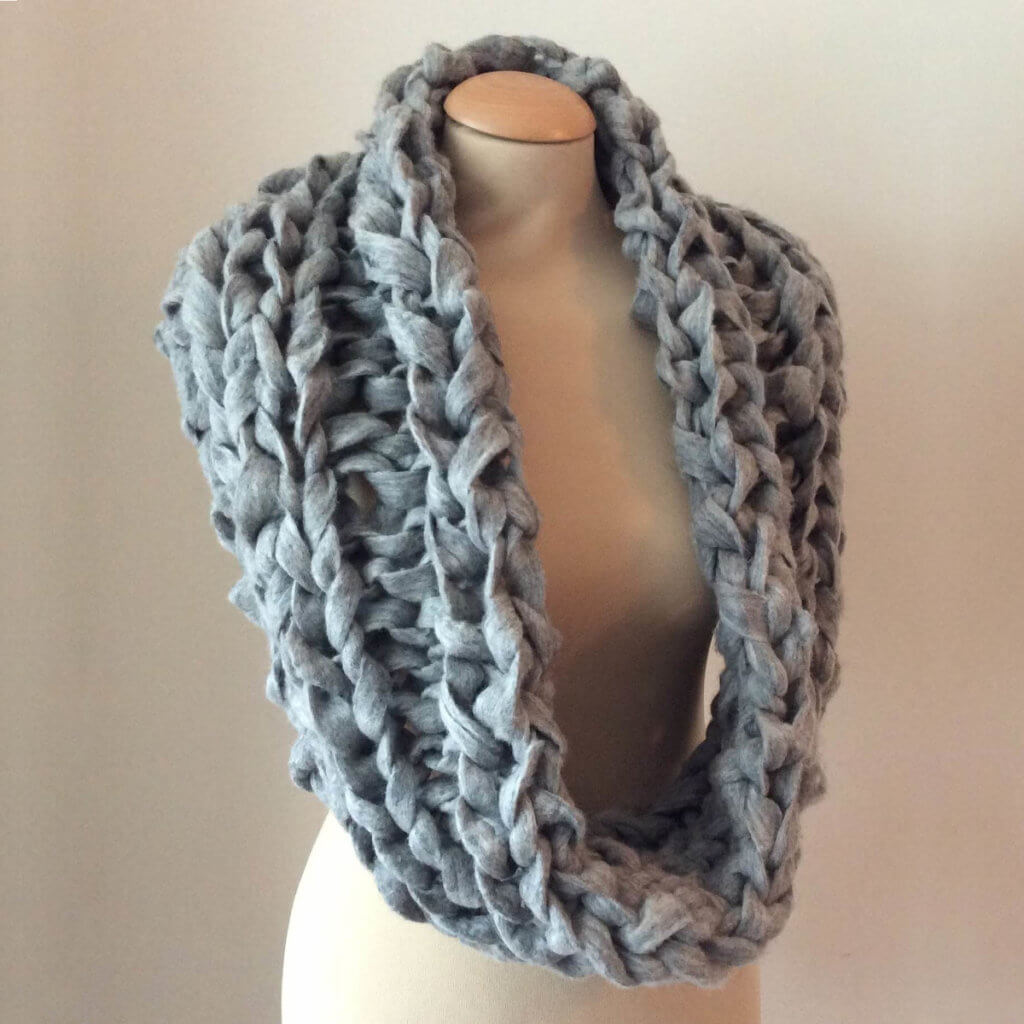
Reversibility Depending on the type of project, it can be desirable for the stitch pattern to be reversible. In other words, that your project will be pretty on both sides. For a long scarf or cowl I think that’s really nice to have, because both sides are often visible. That is why I have chosen a simple straight-purl stitch pattern for this cowl: A two by two rib pattern.
Gymir Cowl pattern
This simply huge cowl has been named after the giant Gymir, who was in Norse mythology the giant whose daughter, Gerðr, ultimately married the god Freyr.
Instructions Cast on 8 stitches, I used the “knitting on” method.
Row 1: *K2, p2; rep from * to the end of the row.
Repeat row 1 until your yarn almost runs out, making sure to leave enough to bind off and connect both ends of the piece. Bind off.
Finishing “Sew” both edges of the piece together to form a loop by pulling the remaining yarn through the fabric of both edges by hand. Enjoy your GIANT result!
And for comparisons sake, below my Gymir cowl in progress as well as another project on 5 mm needles.
Cycling enthusiast or not, many people will be aware of the Tour de France in the Summer months. Especially the festive start in Utrecht this year, the Grand Départ, has brought many Dutch people to active cheering. What is less known is that at the same time with the Tour de France another international event takes place: The Tour de Fleece, abbreviated TdF.
What is the Tour de Fleece?
The idea is simple, for the duration of the Tour de France spinners from all over the world get together both online and offline to spin wool and other fibers into yarn. Cyclists have their wheels spinning in the round and we let our spinning wheels and spindles spin. It is actually more of a “Spin-Along” then a competition in which experiences and results can be shared. There are no hard and fast rules, the main thing is to challenge yourself and have fun!
Just like the Tour de France participants of the Tour de Fleece are organized into teams. There are several “official” teams that stay connected through the Tour de Fleece group on Ravelry. There are also a lot of “wildcard” teams that share experiences and progress in other groups. I myself join Team Karma, from the Karma Swap the Dutch group on Ravelry.
Goals
For me, this was the first time to join the TdF, which of course makes it extra special. I have not set myself targets of the type of “spinning x meters” or trying out specific techniques. That’s largely because spinning is for me pure hobby. Knitting and crochet I usually do for my own designs and patterns. So if I want to do something different, which is also finished fairly quickly, then I go spin myself some yarn. Making yarn for me is much faster than knitting it!
During this TdF I have therefore only set the target to just spin than usual and enjoy the social element. Not just online but also offline. For Team Karma we got together for a kick-off spin-in in the backyard of one of the ladies. It was very relaxing and fun!
The photos show what I’ve made during this Tour de Fleece. A lot less than other folks, but I sure had fun. Next year I’m certain to participate again!
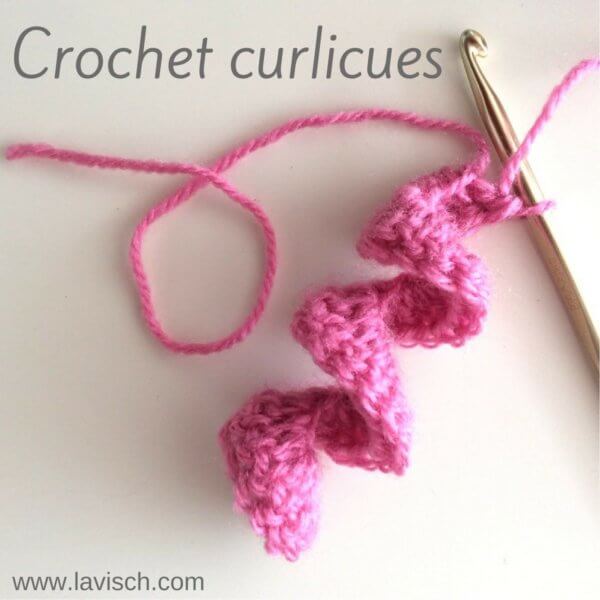
There are many ways to finish the edges of knitted or crochet projects. To name a few examples: crab stitch, shell stitches, and picot stitches. Fringe is also a lovely way to finish scarfs, shawls, blankets etc. But sometimes it is fun to just give it another twist. The answer to that is quite literally curlicues!
Curlicues not only give a lovely result, but are also very addicting to make.
Here you can find how to make curlicues yourself. For the example, I used a generic worsted weight acrylic yarn and a 5 mm (US H-8) hook. These instructions are written in American English crochet terminology.
This is how to make your curlicues step by step:
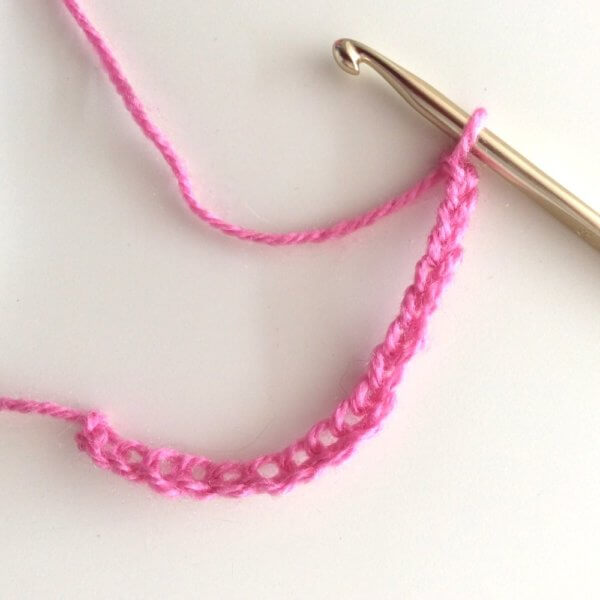
1. Make a chain in the length you would like your curlicue to have, plus 3 extra chains. In this example, I’m using 15 chains + 3 chains. Be careful not to make the chains too tight, because that will make it harder to crochet into it later.
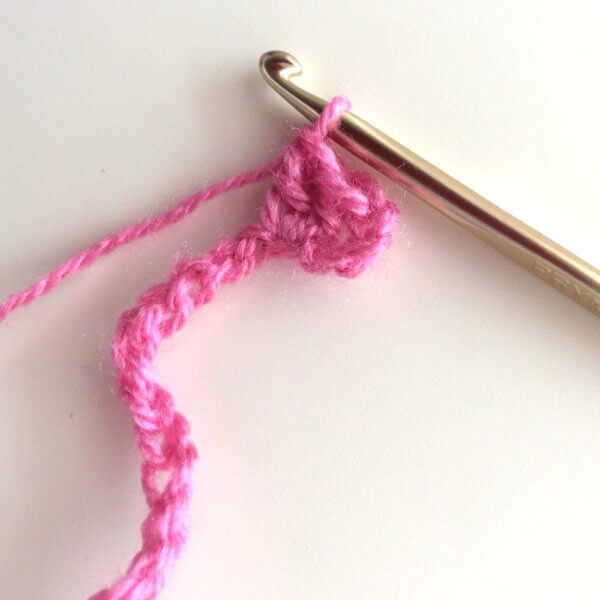
2. Make 2 dc in the 4th chain from the hook.
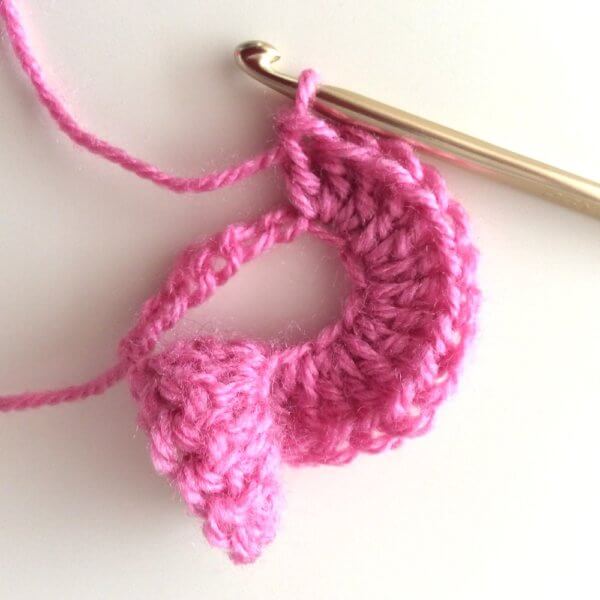
3. Next, make 3 dc in each following chain. For the result, it doesn’t really matter where exactly to place your hook into the chain. Use the way you find easiest or gives the nicest result to you. When you are about halfway the initial chain, you should slowly see the curlicue shape emerge!
And here the curlicue is all done, isn’t it cute?
You can also get nice effects by not making the curlicues not in a solid colored yarn, but in a variegated one. You can also make curlicues with half double crochet (hdc) stitches instead of double crochet (dc) to get a less wide result.
Curlicues are also fun to dress up stuffed animals with, think of the arms of an octopus, or the wild manes of a lion. The sky is the limit!
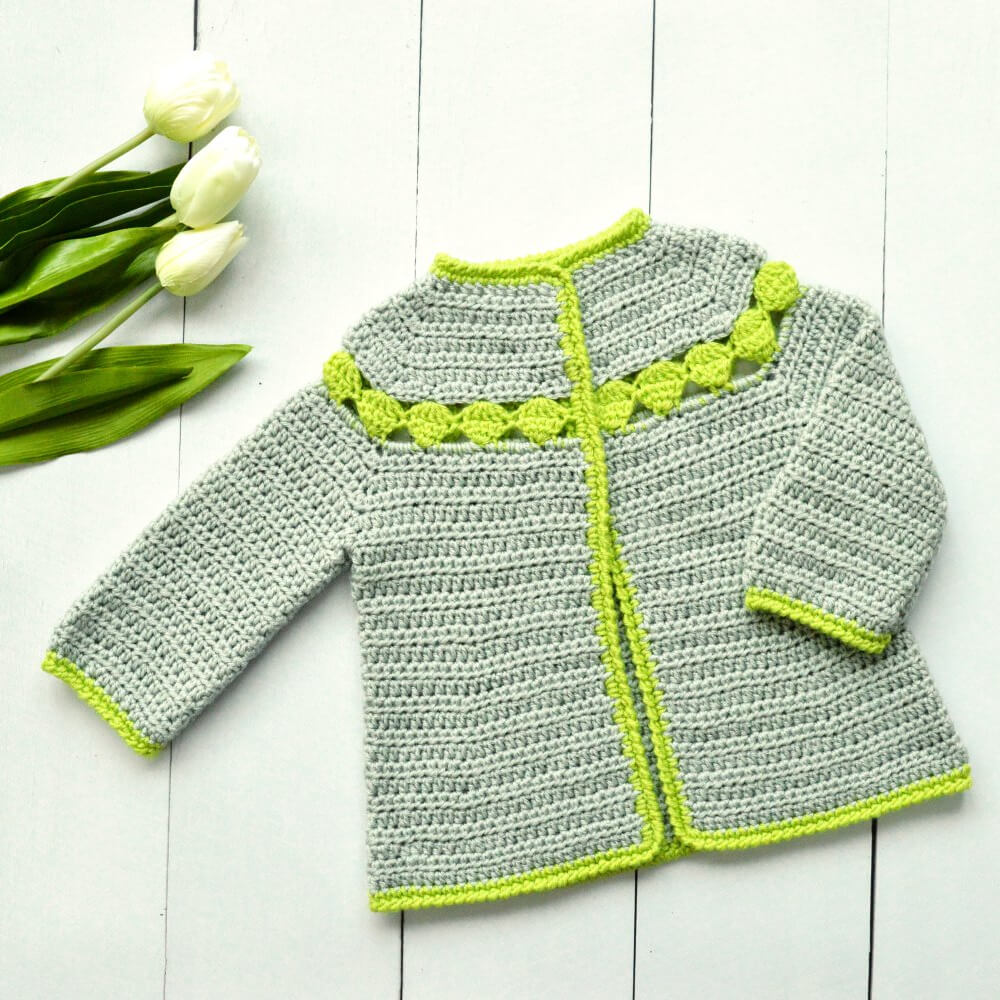
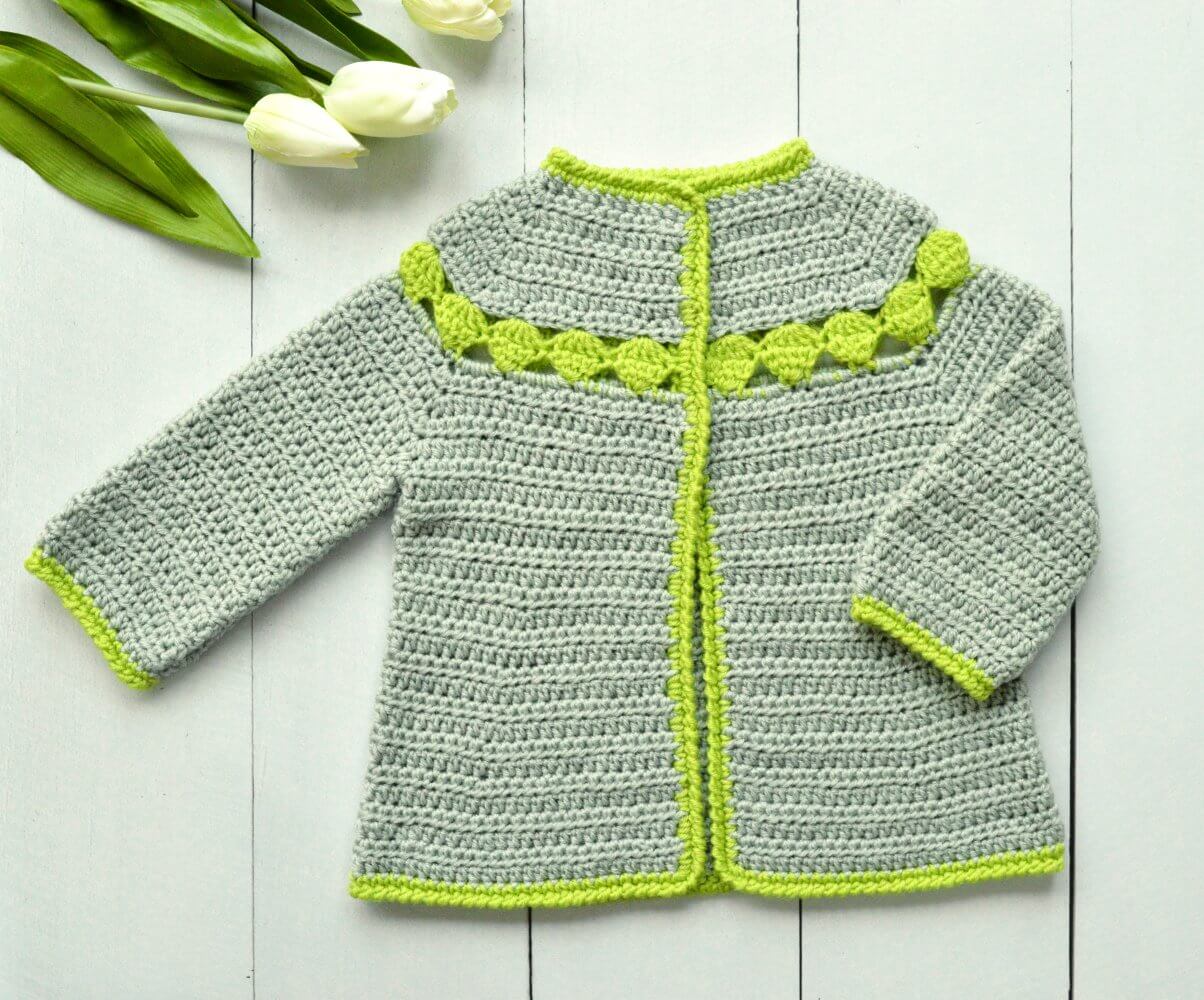
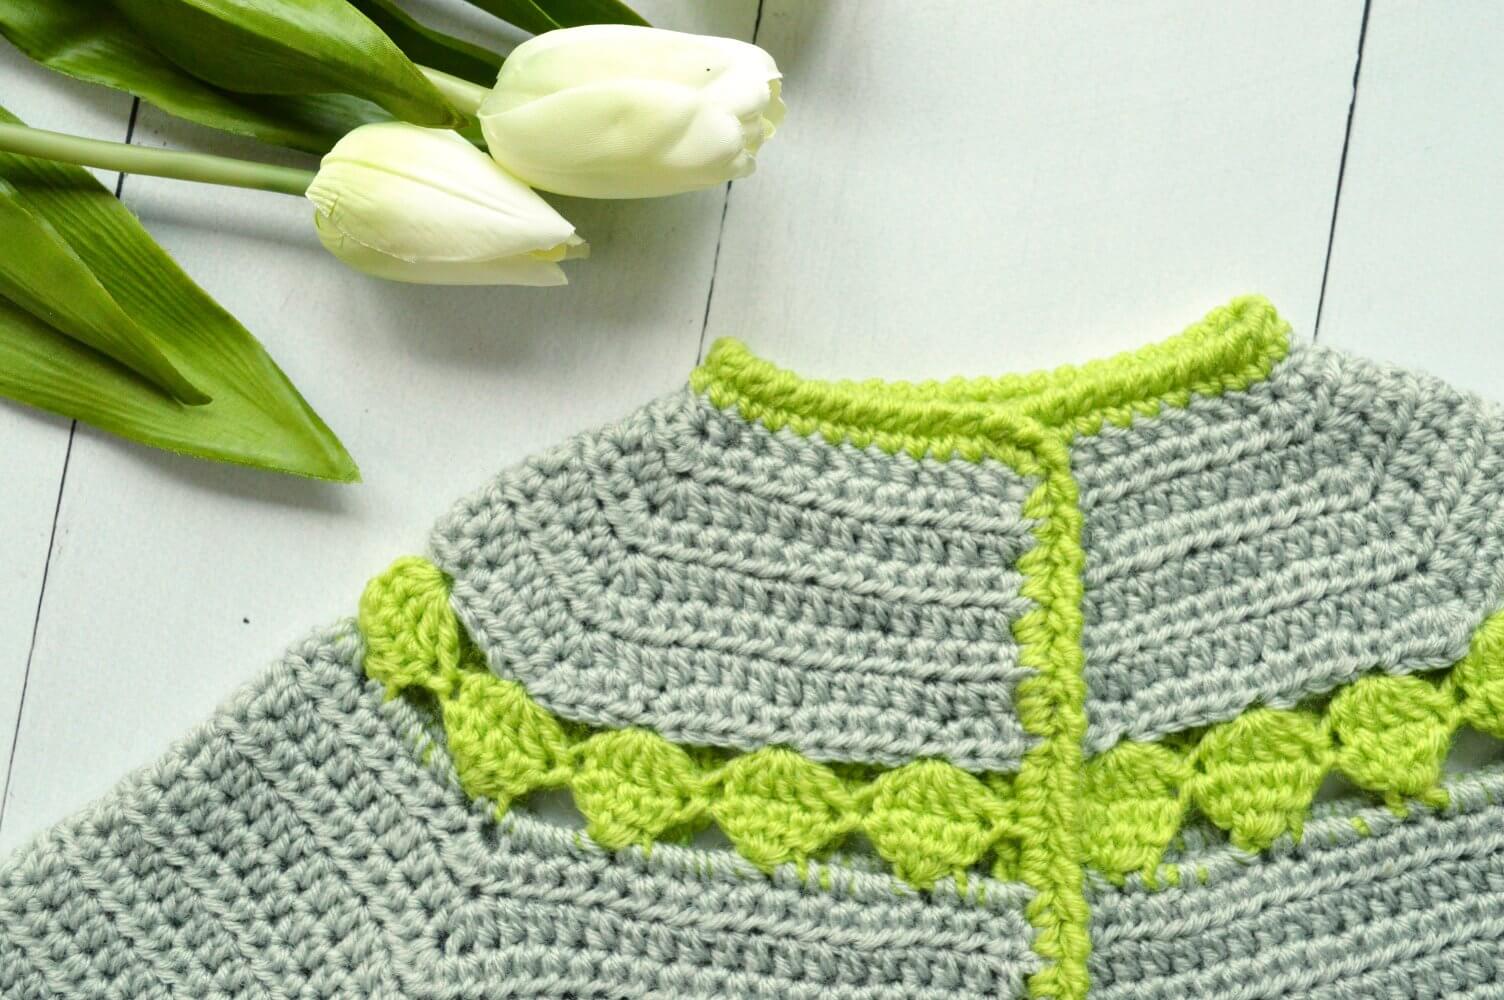
The little two-tone Stip Baby Cardigan is a simple and elegant layering piece for when the weather is still cold and a little extra warmth is much appreciated. With its eye-catching dot yoke and soft A-line shape, this cardigan is bound to become a timeless favorite.
The cardigan is worked back and forth from the top down in one piece. Finish the piece with a reverse single crochet neck and hem finishing in a contrasting color. This pattern is written in American English crochet terminology.
Pay what you want: (minimum €7.10)
€
Sizing
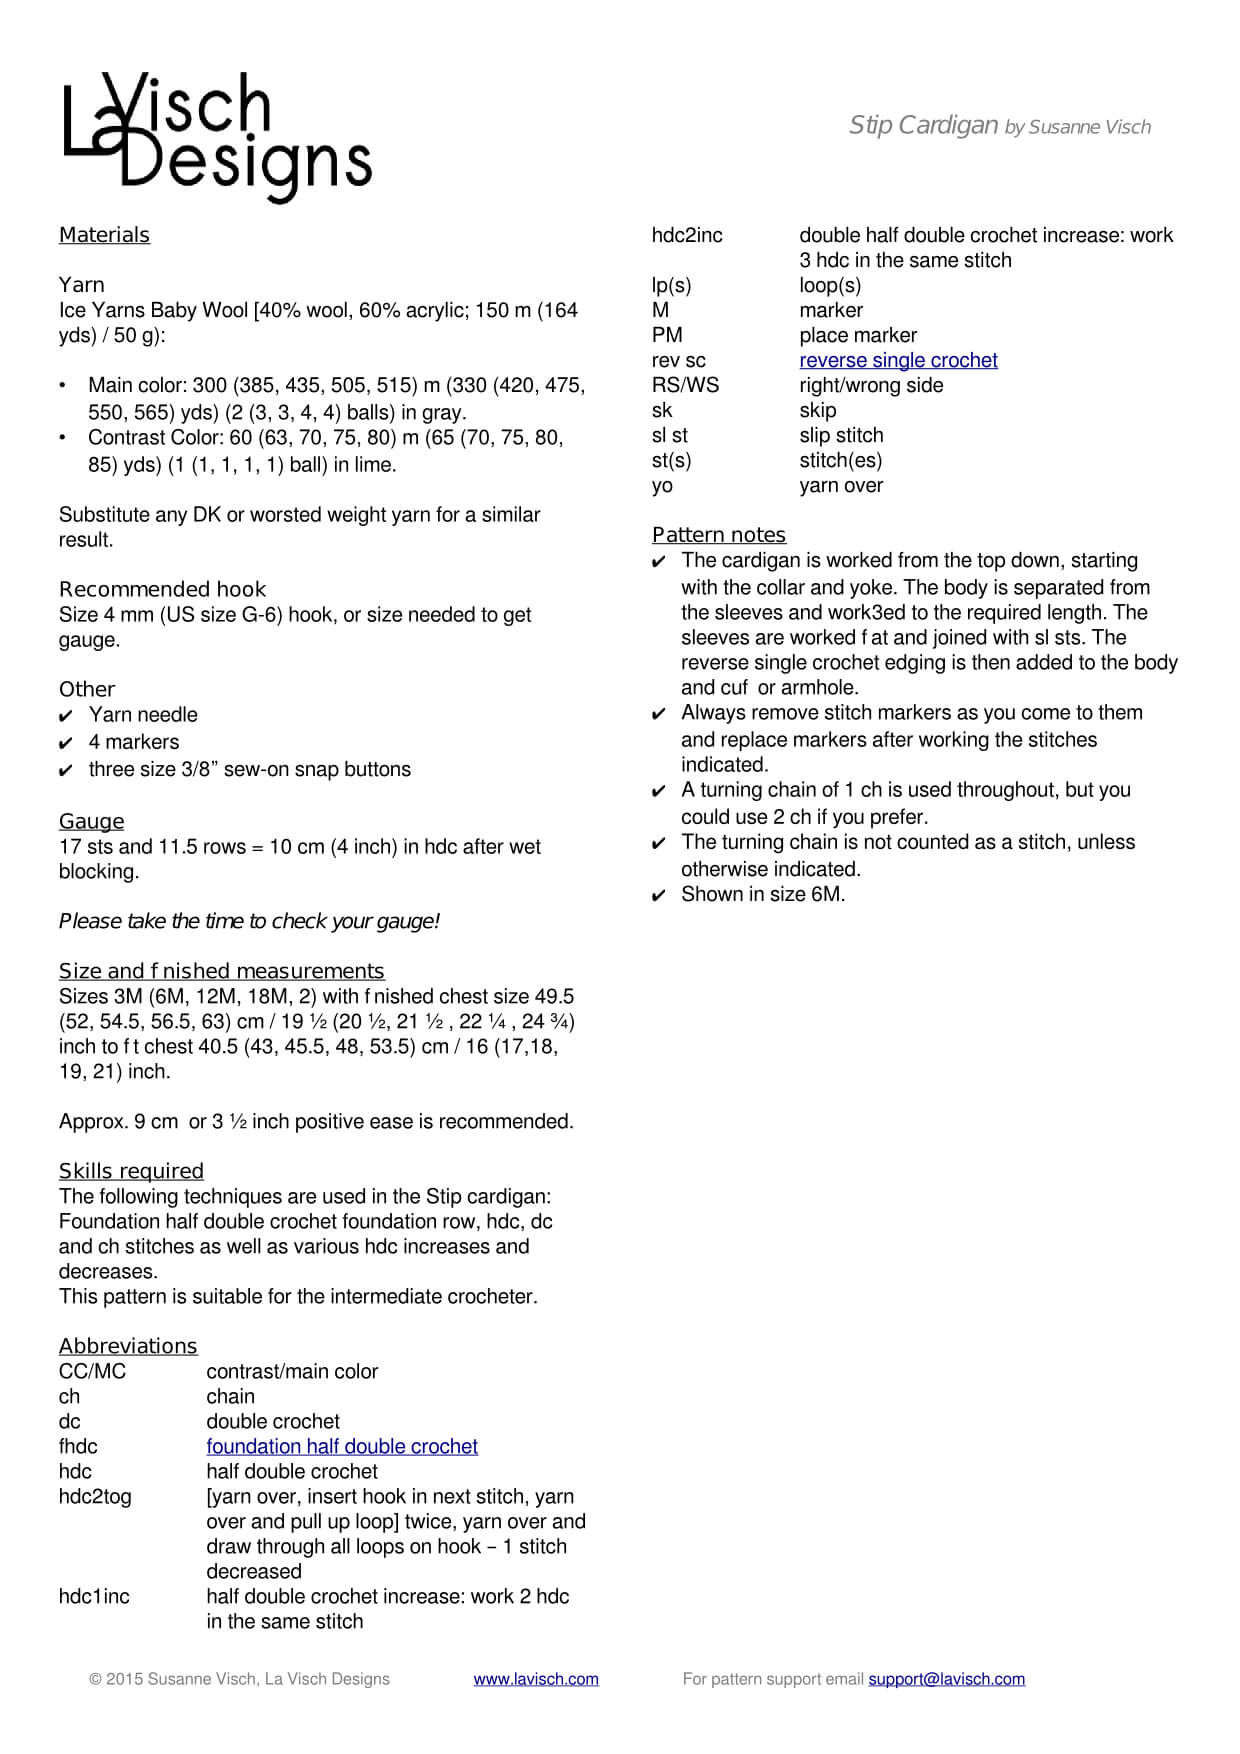
This pattern includes the following baby sizes: 3M (6M, 12M, 18M, 2) with finished chest size 49.5 (52, 54.5, 56.5, 63) cm / 19 ½ (20 ½, 21 ½, 22 ¼ , 24 ¾) inches to fit chest 40.5 (43, 45.5, 48, 53.5) cm / 16 (17, 18, 19, 21) inches. Approx. 9 cm or 3 ½ inches positive ease recommended.
Difficulty
Techniques used in the Stip Baby Cardigan consist of foundation half double crochet foundation row, hdc, dc and ch stitches as well as various hdc increases and decreases. This pattern is therefor suitable for the intermediate crocheter.
Pattern details
Crochet this design top-down
Gauge: 17 sts and 11.5 rows = 10 cm (4 inches) in hdc after wet blocking.
Pattern languages included: English and Dutch (Dit patroon omvat zowel een Nederlandse als een Engelse versie).
Digital PDF has 4 pages (A4 size)
Yarn
For this design you need yarn in DK or worsted weight in the following quantities for a similar result:
Main color: 300 (385, 435, 505, 515) m (330 (420, 475, 550, 565) yds) in gray.
Contrast Color: 60 (63, 70, 75, 80) m (65 (70, 75, 80, 85) yds) in lime.


 Cycling enthusiast or not, many people will be aware of the Tour de France in the Summer months. Especially the festive start in Utrecht this year, the Grand Départ, has brought many Dutch people to active cheering. What is less known is that at the same time with the Tour de France another international event takes place: The Tour de Fleece, abbreviated TdF.